Contents
Different ways to create instructional videos
Steps to create an instructional video
How to create instructional videos with Vmaker
Tips for a professional instructional video output
Best tools to make instructional videos
Take it easy with your first video
How to Create an Instructional Video | Pro Tips & Best Tools
Creating instructional videos is easier than you think.
Instructional videos are great for demonstrating a process or creating a step-by-step guide. There are plenty of reasons to make them: educational content, HR training, product or service walkthroughs, and more.
There are a few ways to create instructional videos: animated, screen recorded, and camera-recorded with a narrator on screen.
Different ways to create instructional videos
Animated videos
These are effective and eye-catching. Done well, animated videos work great for instruction. But they come with flaws. Animated videos are expensive to create, they require a specialist to illustrate and animate the whole video, and the turnaround time is slow.
Camera recorded videos
These are effective at accomplishing the video's objective. The narrator's face builds a one-to-one connection with the viewer. However, they are laborious to create: you need a high-quality camera, proper lighting, and a suitable background. Once recorded, the footage still needs editing. That makes the format expensive and labour-intensive.
Screen recorded videos
These are gaining ground fast. Screen recorded videos capture the screen, webcam, and voiceover simultaneously using an online tool. They are easy to create and extremely cost-effective. You usually need only basic equipment such as a PC and a webcam, and no special skills, so anyone can make them.
If you are looking for a fast, easy, and cost-effective method to create instructional videos, screen recorded video is the way to go. We will focus on this method in this guide.
Before going further: setting the purpose of your instructional video is essential. Once that is set, you can fix the duration so it is effective for viewers.
Optimal video duration by purpose:
- For educational purposes, videos can run 10 to 15 minutes.
- For product or service instructional videos, keep the length under 4 minutes.
- For HR training, 3 to 7 minutes works well.
One tip: keep your videos as short as the content allows.
Overcoming practical hurdles
The world is moving toward simple solutions for complex problems. Many of us work from home and do not have access to fancy equipment, an aesthetic background, or even a noise-free environment. That is completely fine. You do not need any of it, or even a script, when you use a screen recorder to create instructional videos.
Steps to create an instructional video
Step 1: Create a storyboard
Do not freak out: this is not an artistic storyboard. Just list the points you want to include in each scene: the introduction, topics covered, key takeaways, tips and tricks, call to action, and so on. Add prompts or one-liners that give you the context for what to talk about in each scene.
This helps you progress through your content as you record. You can build a simple storyboard in a PowerPoint deck: set up slides for each section and write the topics to be covered in a 2x2 box.
You can also use online storyboard creators if you prefer.
Step 2: Get feedback
Share your storyboard with friends and colleagues. A third-person perspective helps you make the video more effective before you record a single second.
Step 3: (Not) writing a script
Technically this would be the next step, but we are going to skip it. Since you are creating an instructional video by recording screen and webcam, the screen you show viewers gives you context and helps you explain without a script.
How to create instructional videos with Vmaker
It is always a good idea to keep things simple. Vmaker is a strong instructional video maker that keeps core functionality and usability simple for both paid and free users. You can record your videos effortlessly and have them saved in cloud storage, which frees up space on your PC and makes sharing easy. With that said, it is time to set up Vmaker and get going.

Setting up Vmaker on your PC
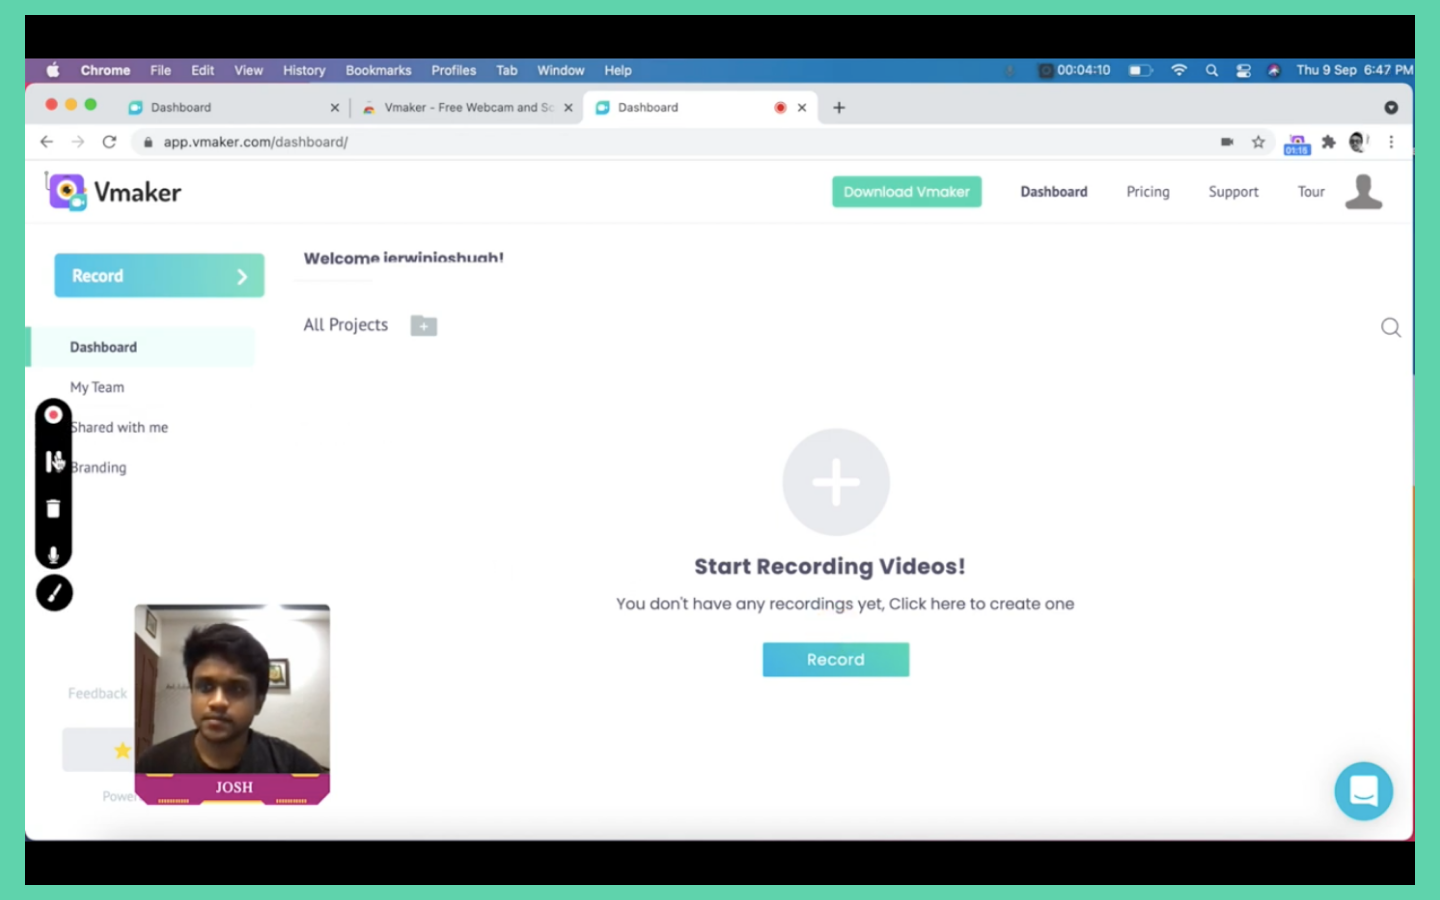
- Visit www.vmaker.com and sign up using your email address or social login.

- Once logged in, you land on your dashboard. Add the Vmaker Chrome extension. If you are a Mac or Windows user, you can download and install Vmaker's Screen Recorder for Mac or Vmaker's Screen Recorder for Windows. Vmaker is also available on iOS (beta).

3. After installing the Vmaker Chrome extension, pin Vmaker to your browser so you can access it quickly.

4. Click the Vmaker icon to launch it.
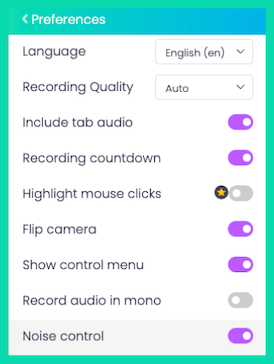
5. Open preferences and turn on noise cancellation. This helps cut down unwanted background noise.
6. Turn on the mouse emphasis feature to highlight sections when you click.
7. Return to the main screen and select the screen and webcam recording option.
8. Set up a frame for your webcam bubble by clicking the frame icon.
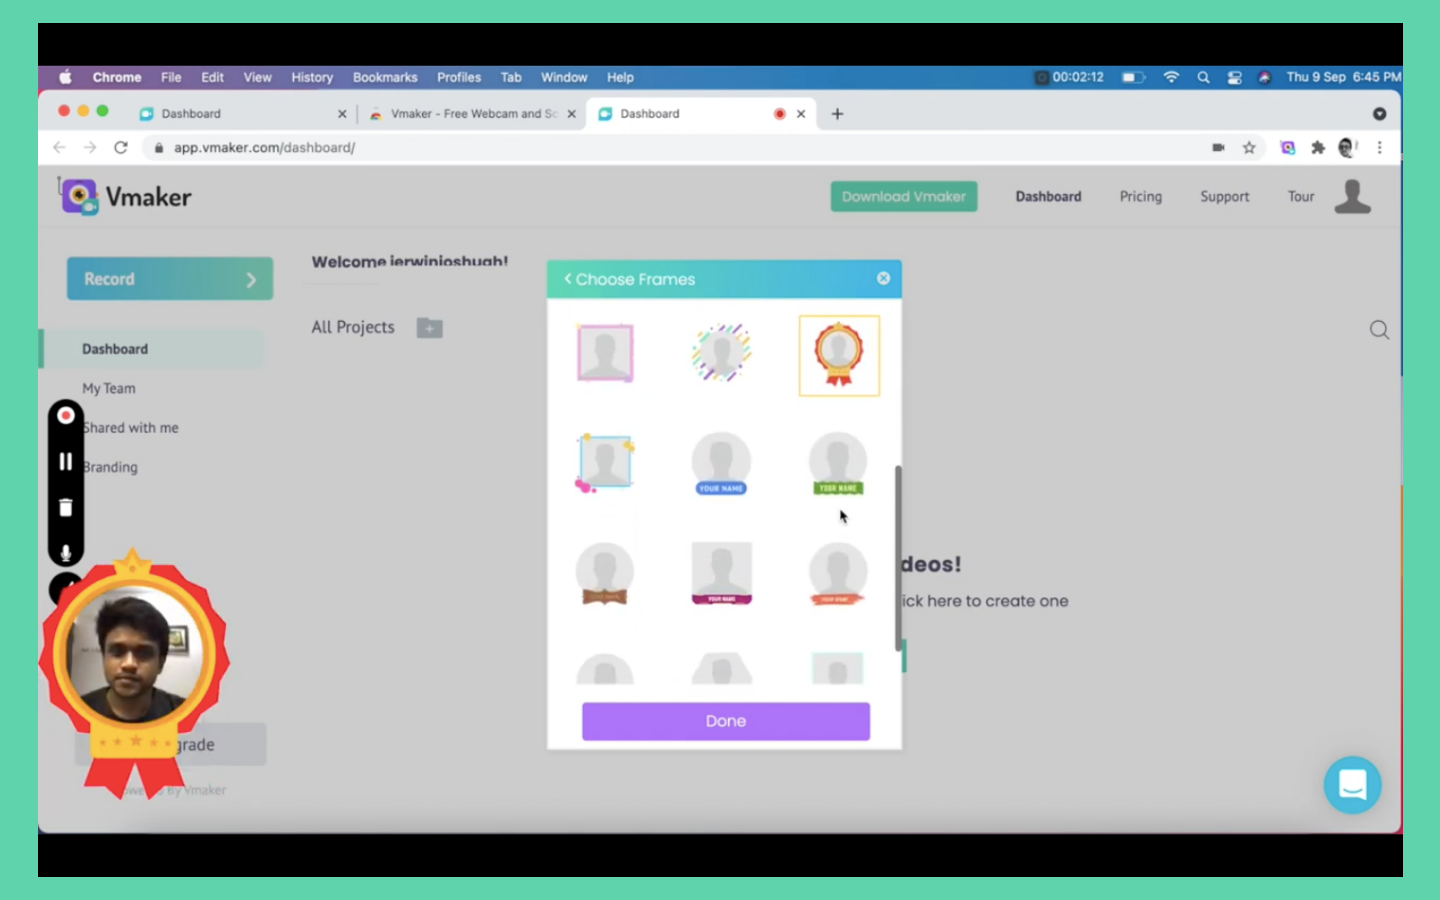
- Choose your frame. Pick a fancy one or a purposeful one and set up your name.
- You can also use the frame to title the video and show what it is about.
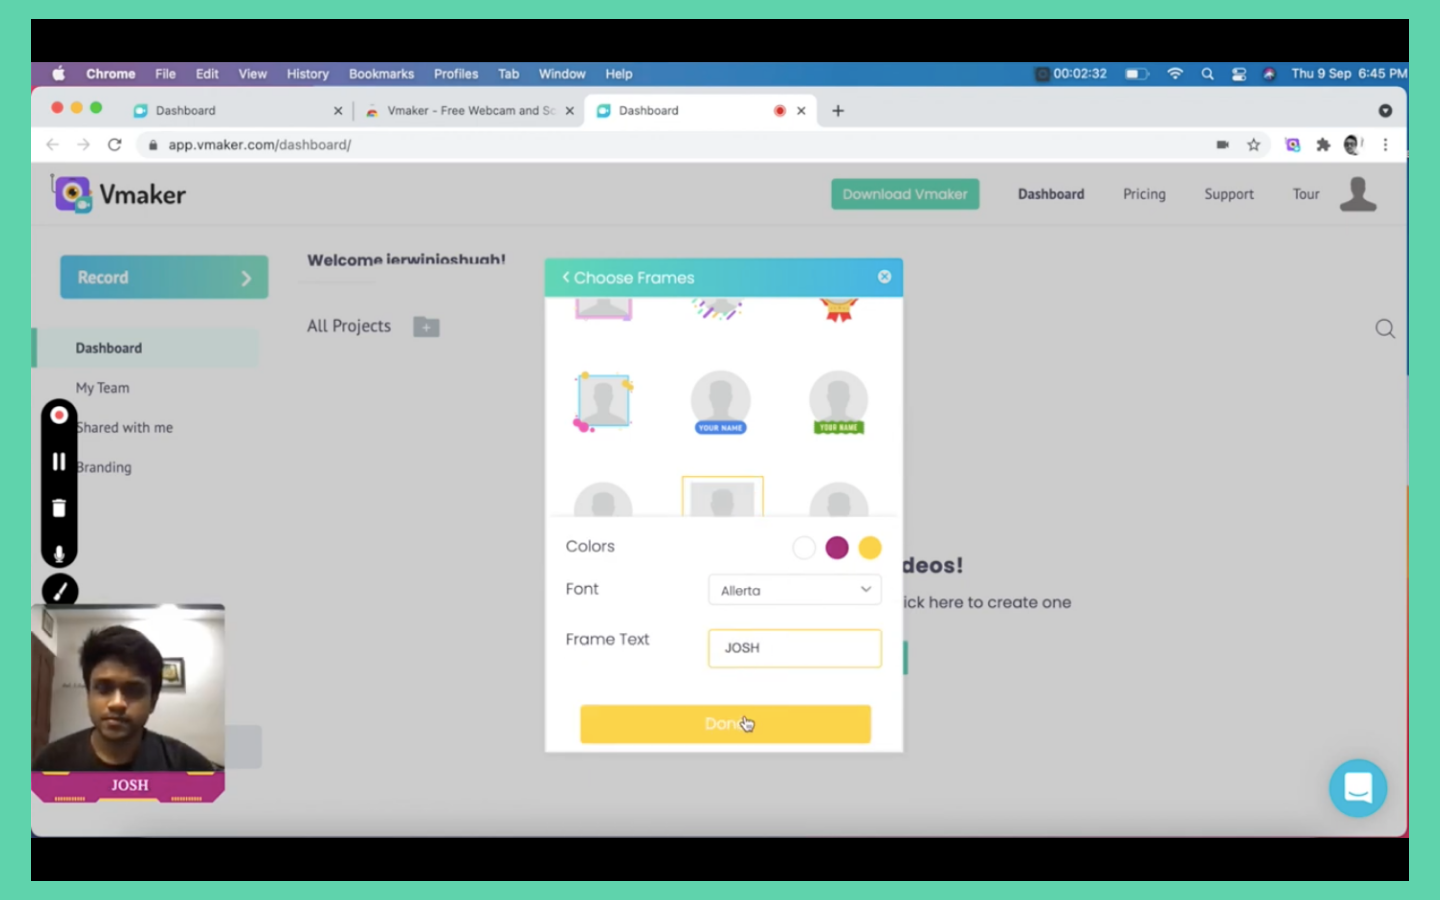
- Move and place the webcam bubble wherever you want it on screen.
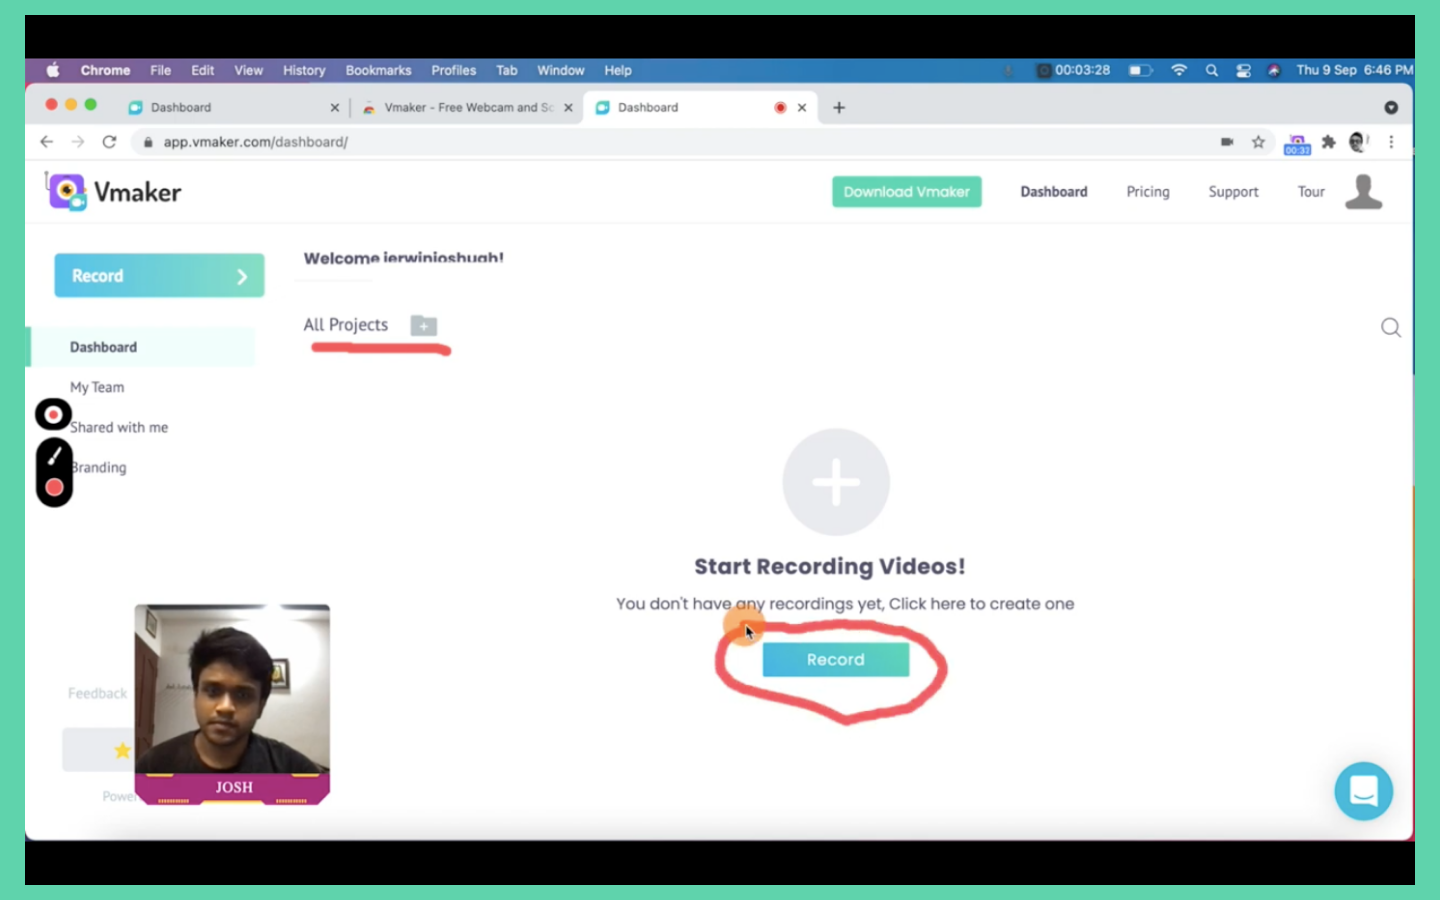
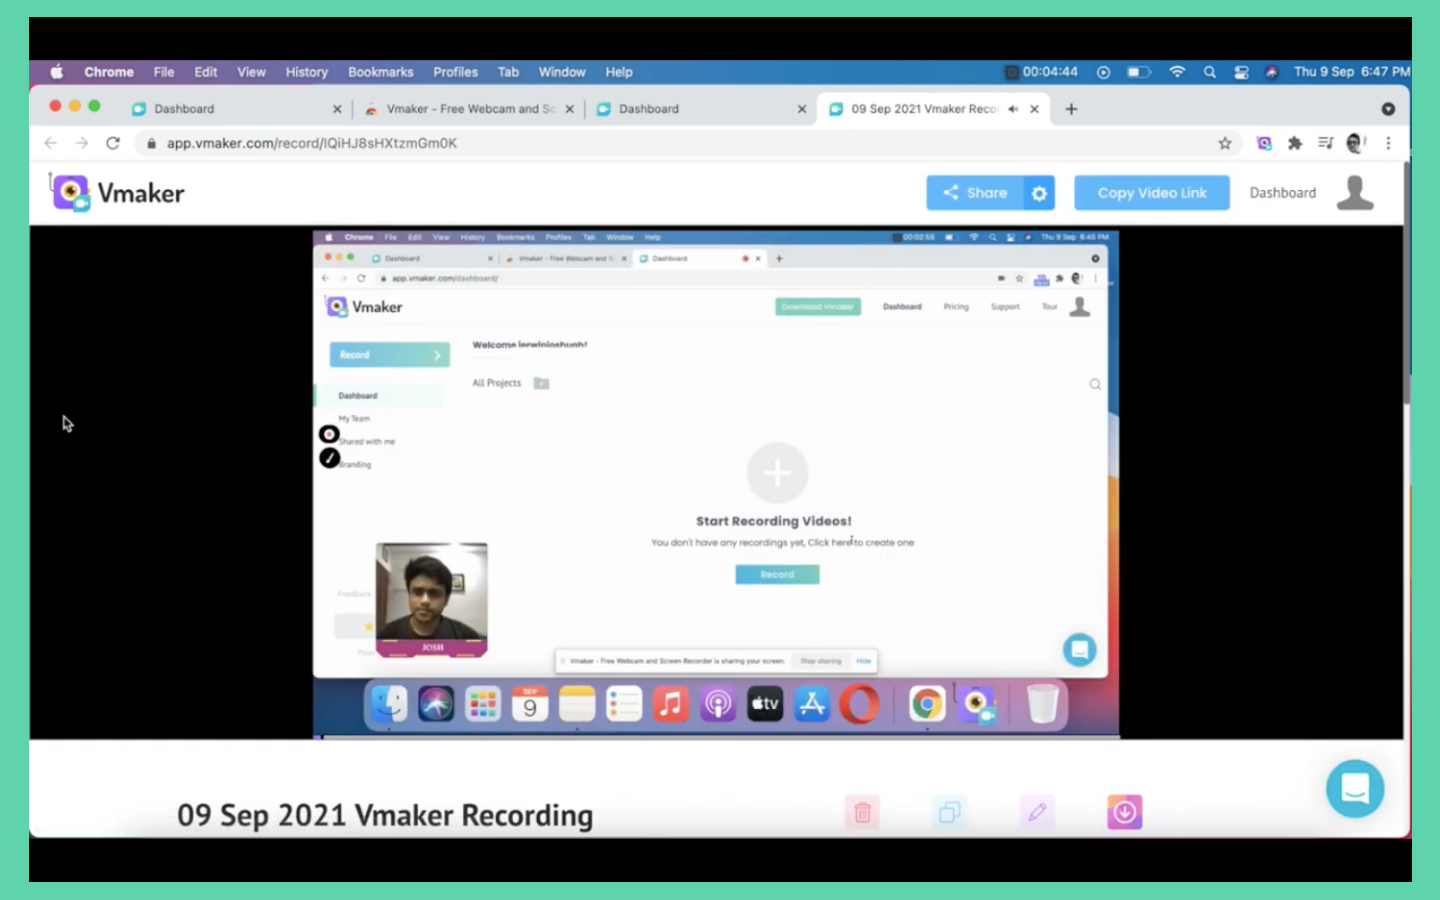
- You are all set. Click the start recording button to begin.
Recording in progress
While recording, use the screen annotations feature to draw and highlight sections of your video. It makes the video engaging and grabs the audience's attention.
You can also use mouse emphasis. Whenever you click, the mouse is highlighted, which is useful for showing viewers the movement and actions of your cursor.
As you record, pause the video if you make a mistake. You do not have to start over. The unwanted section can be removed later in the editor. Click play to resume from where you left off.
Some people prefer a flawless video with no mistakes. That is fine. But trust me, if you make mistakes, it is easier to edit them out than to record the whole video over and over.
When you are done, click the stop button on the left of the screen, or click the Screen Recorder Chrome extension. This is where the magic happens: your video uploads automatically to Vmaker cloud storage. You can access it on the player page or through your dashboard.
The next step is editing. Before you start, it is a good idea to duplicate your video so you always have the original as a backup.
Click the edit button to open your video in the editor. Trim the unwanted sections by selecting the part you want to retain.
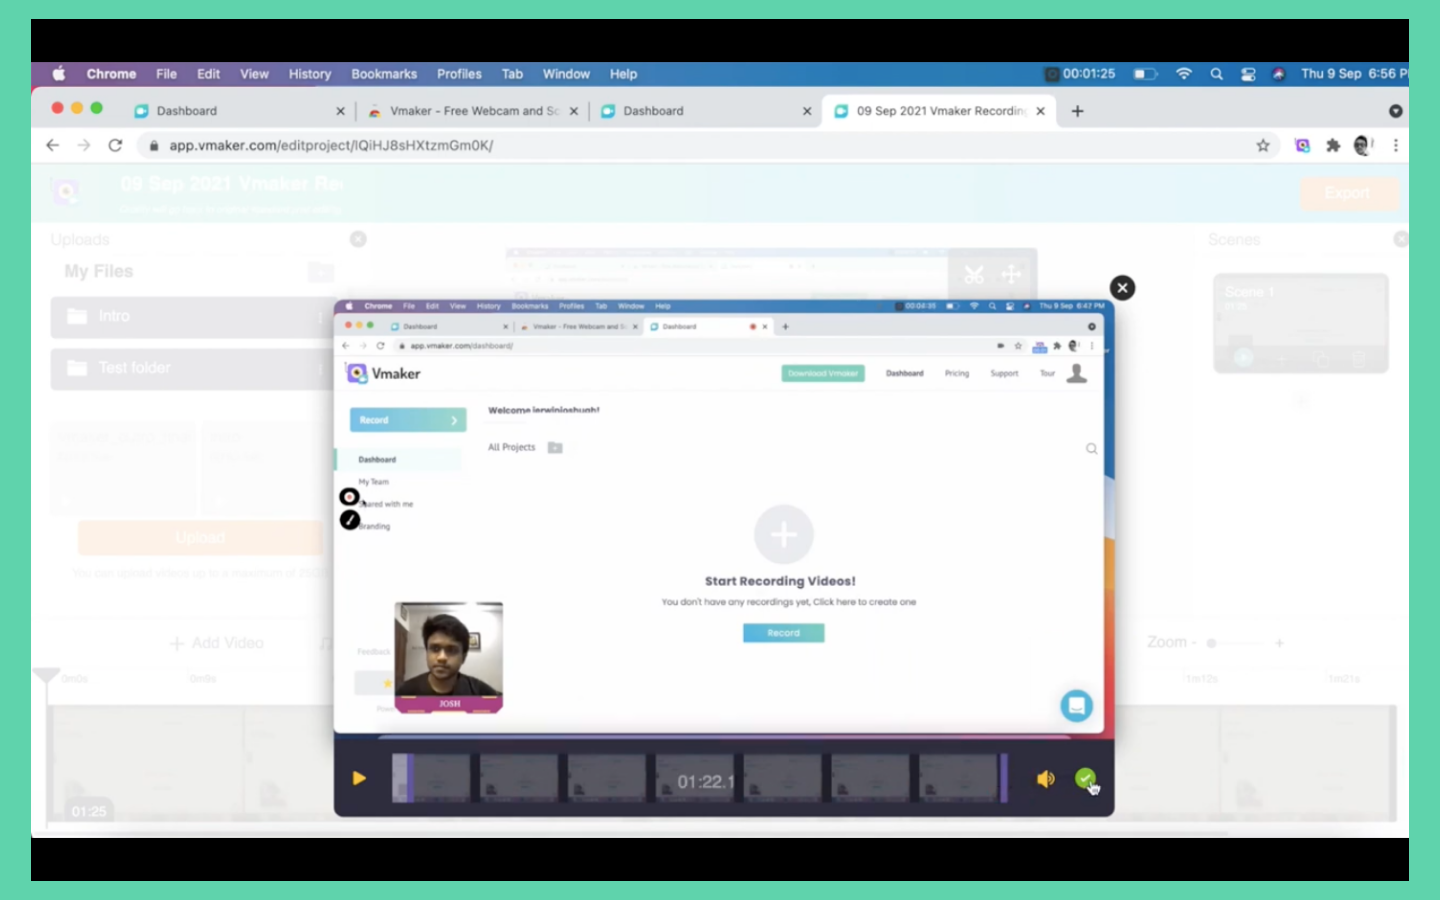
If you have multiple sections to remove, duplicate the scenes and trim out the rough edges.
You can also add intro and end slides using the scenes feature. Upload the intro and end slides in MP4 format, add scenes to the start and end of the video, and place your uploaded slides.
Now export the video. Select your resolution and click export. You will see a render screen. Do not close the browser while this runs. Your video appears on your dashboard once it has rendered successfully.
Getting feedback on the video
Now that your instructional video is created, show it to colleagues and friends for feedback. Do not worry if they suggest changes. You can record the revised sections in Vmaker, download them, and merge them with the existing video using the scenes feature in the editor.
Follow the same steps you used to add the intro and end slides.
Once the final video is ready, download it from the player page or share it directly to YouTube and other social platforms.
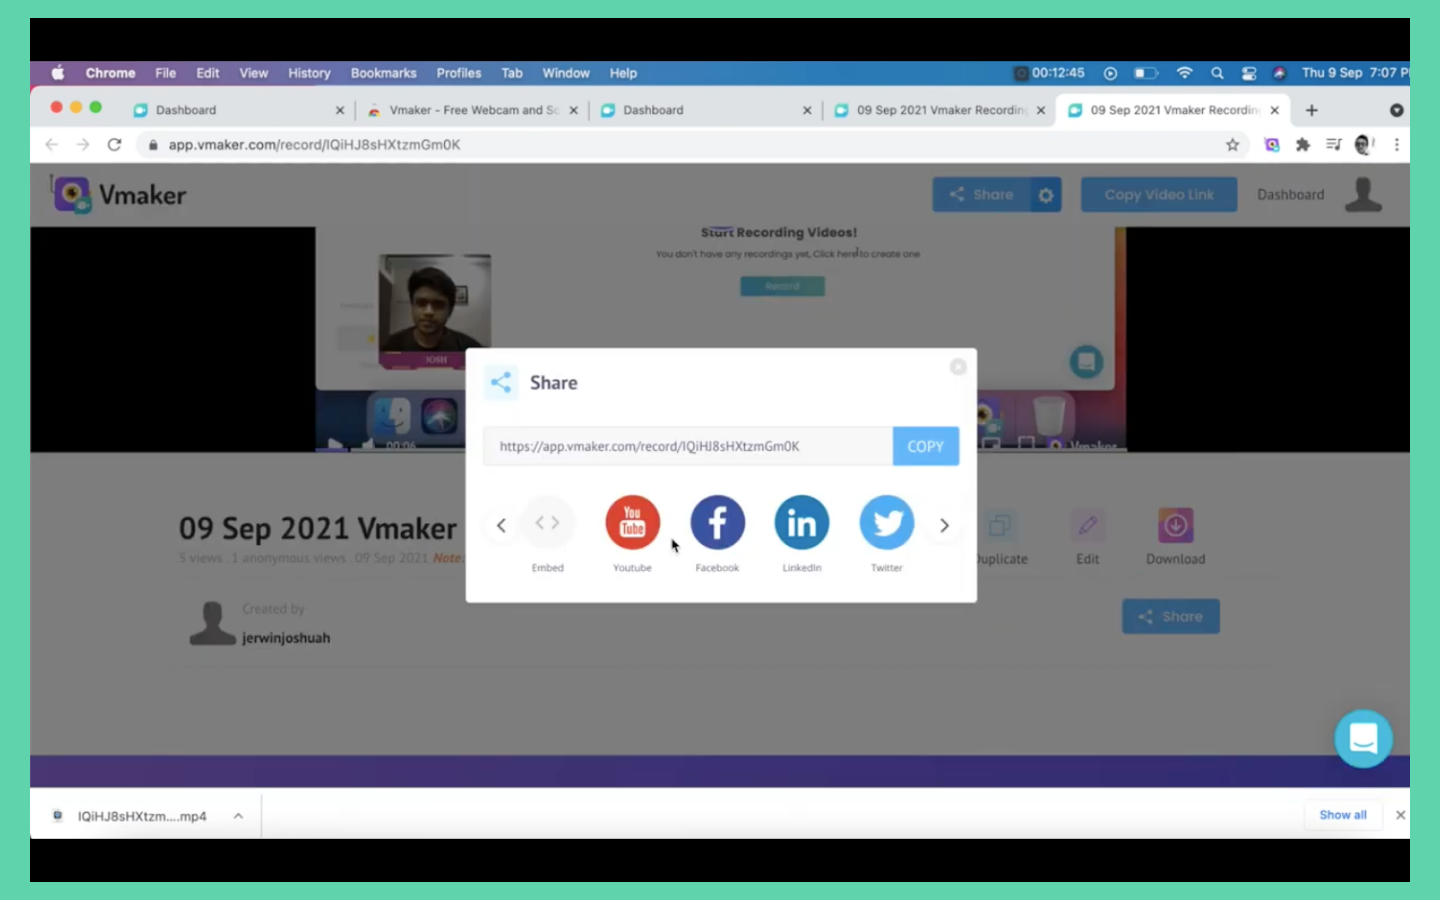
Click the share button and click the YouTube icon. Add your YouTube channel and that is it: your video uploads directly to YouTube from Vmaker, which saves you time.
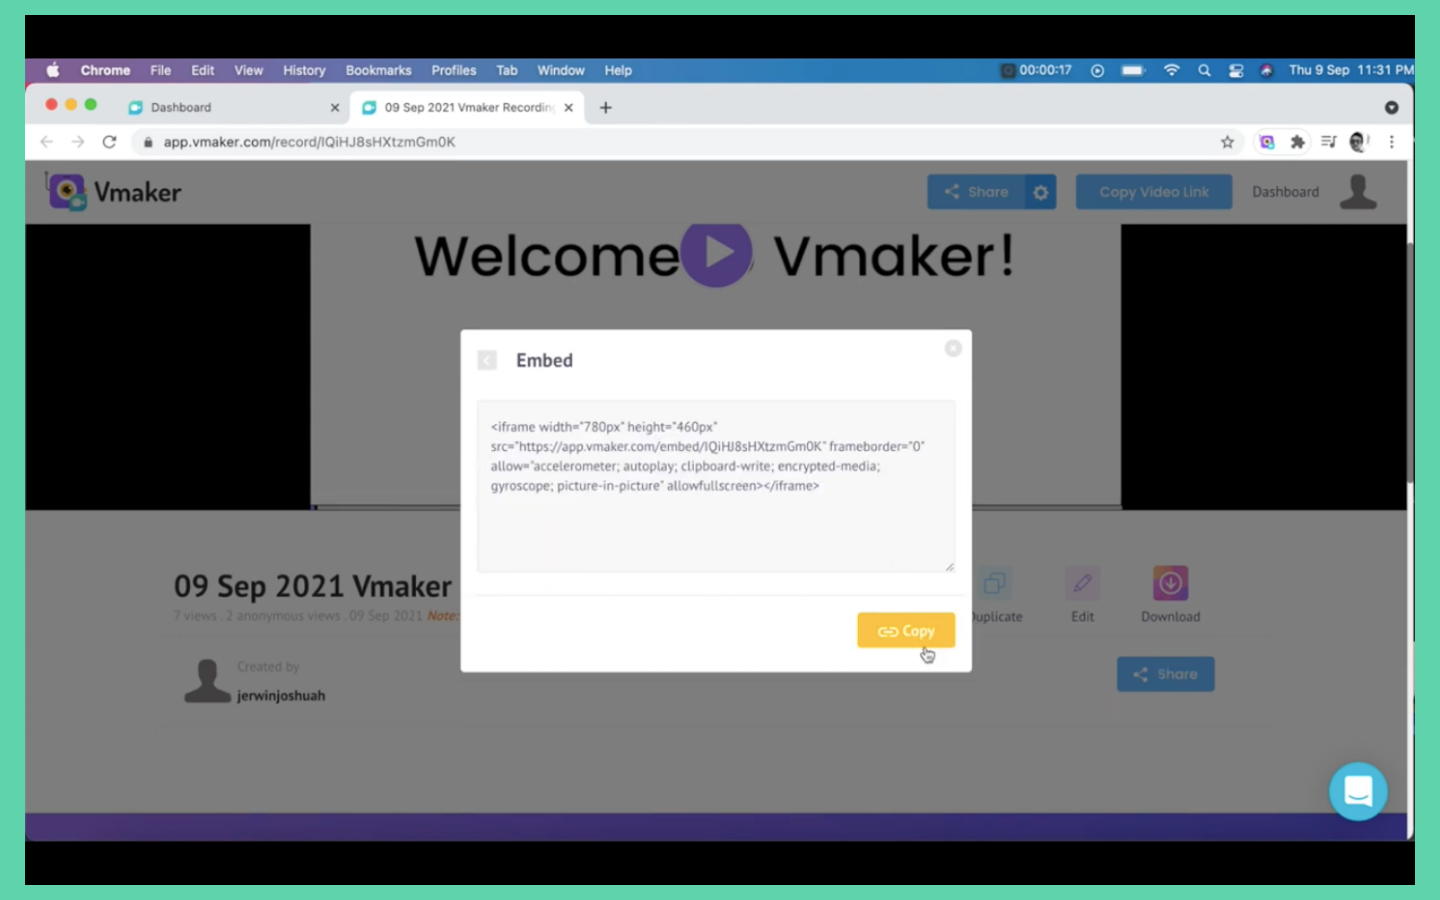
To share on social media or any other channel, copy the video URL and paste it elsewhere. Viewers click the link and watch without downloading.
You can also embed the video on your landing page by copying the embed code.
That was straightforward. Here are a few more tips to help with your instructional videos.
Tools you need to get started
- A personal computer

A laptop or desktop works. You do not need a high-spec machine. If you use a laptop, connect a mouse, since annotation tools work better with a mouse than a trackpad.
- A webcam

An inbuilt camera does the job. For better quality, go for a USB webcam that records in high definition. Choose one compatible with your computer.
- A selfie light
A selfie light helps when recording your webcam. Pick one you can comfortably place on a table so the light spreads evenly across your face. Some selfie light models are suitable for mobile recording only, so check before buying.
- A microphone

A USB microphone that connects directly to your computer works well. Choose a podcasting microphone with a pop filter: it filters ambient noise and provides the right amplification for non-studio recording.
Tips for a professional instructional video output
- If you are recording from home, find a place that is well lit.
- Pick a time to record when you can avoid background noise and distractions. Recording at night often means zero disturbance. If you are in an office, find a quiet spot and let colleagues know you do not want to be disturbed.
- Select the scenes and visuals you want before you start recording, and add them to your storyboard.
- Clean up your desktop. Remove unwanted files and hide personal data before you start recording.
- Make sure your speech is loud and clear. Adding dynamics to your voice is a plus.
- Having your face appear in the video personalises it and makes it easier for viewers to connect with your content.
- Highlight the important parts of your screen using screen annotations while recording.
Best tools to make instructional videos
Screen recorders let you create videos by recording your screen and webcam. There are some great options available. Here are the top 5 screen recorders to consider for creating your instructional videos.
Vmaker AI
Vmaker AI lets you create, edit, and record your screen, webcam, or both with voiceover. The biggest USP is its versatility across video creation and editing. Smart features include screen annotations, mouse emphasis, an inbuilt editor, unlimited recording, and cloud storage. Vmaker also offers a complete white-labeling solution that lets you add your brand logo, colours, and a custom URL for your videos. All of this comes with strong pricing and reliability, which makes it a great app for instructional videos.
Vmaker highlights
- Unlimited recording and cloud storage in the free version
- Extremely reliable
- Value-for-money proposition
- Automated video editing
- AI subtitle generator in 35+ languages, plus AI dubbing in 100+ languages
- Supports up to 4K recording
- Strong customer support
- Manual editing suite including a video cutter, video trimmer, video merger, video speed changer, aspect ratio adjustment, video cropper, video resizer, add text to video, add audio to video, and more
Here is an elaborate guide on How to Make Instructional Videos with Screen Recording using Vmaker.
Screencastify
Screencastify launched in 2013 and was one of the first screen recorders available. It has been in the market a long time, but there are key differences from newer tools. There is no native cloud storage; recorded videos upload directly to the user's Google Drive, so limited Drive storage can make things difficult. The screen recorder and editor are not offered as one pack, though you can buy them separately or together based on your needs. Screencastify does not offer a white-labeling solution.
Screencastify highlights
- No limits on the number of recordings (Google Drive storage dependent)
- Screen recorder and editor are not bundled as one package
- Videos can be stored on your local device as well
- Yearly subscriptions only, no monthly option
- Some features offered by newer tools are missing
Here is a detailed Vmaker vs Screencastify comparison.
Loom
Loom is one of the most familiar names in screen recording. Users appreciate its user-friendly interface and the functionality in its player. The premium version is well-loaded, but the free plan has limits, including a cap on recording duration and limited video count. Some users have noted that customer support could be stronger. Loom still offers a polished experience on the premium plan.
Loom highlights
- User-friendly interface
- Proven tool in the market
- Limited editing (mainly trim functionality)
- Cannot add scenes to a video
- Free plan has recording limits
Here is a detailed Loom vs Vmaker comparison.
Movavi
Movavi is a screen recorder focused primarily on individual users, with Mac and Windows applications to choose from. It is reliable for screen recording. A couple of drawbacks: the free version adds a large watermark, and there are no collaborative features for team use. The complete package is available only on a yearly subscription, so even one-time use requires a full-year purchase.
Movavi highlights
- The paid plan is a solid option for individual users
- Native applications for Mac and Windows
- Easy-to-use interface
- Videos recorded on the free plan have watermarks
- Cannot be licensed on a monthly basis
Here is a detailed Vmaker vs Movavi comparison.
Snagit
Snagit is a competent product from TechSmith, available as both Mac and Windows applications. TechSmith's long history shows in Snagit's functionality. In addition to screen and webcam recording, you can take screenshots. However, it lags on storage technology: Snagit saves all data on your computer, so you will run out of space if you create long videos. There is no unlimited recording for free users, and Snagit is available only on a yearly subscription with no monthly plan for occasional users.
Snagit highlights
- Has been in the market a long time
- Good for local storage purposes
- Can also be used for screen grabs
- Very limited recording options and features for free users
- Available only on a yearly subscription
- No cloud storage option
Here is a detailed Vmaker vs Snagit comparison.
Instructional video tips
- Keep the intent and persona of your audience in mind throughout. Give an in-depth representation of your instructions, follow a constant pace, use simple and easy-to-understand language, and address the questions that may arise in the viewer's mind.
- Keep your video uncluttered. Make sure your topic, storyboard, and content are aligned and easy to follow. Avoid information that may confuse the viewer, and remove anything distracting from your screen.
- If you have multiple topics, create separate videos for each rather than one long video.
- Always get feedback from friends and colleagues. Feedback is the key to improvement.
Take it easy with your first video
It is okay if your first instructional video is not perfect. The first few are always rough around the edges. You will improve with practice. If you have questions or need help with Vmaker, get in touch with the customer support team through live chat. There is always someone from the team ready to have your back, which is one of the main reasons users love Vmaker.
You can get started creating your instructional video right away by signing up for Vmaker.