Contents
Which screen recorder should you use?
Recording Facebook Livestream videos with Vmaker
Getting started with Vmaker for recording Facebook Livestream videos
Record your first Facebook Livestream video
Frequently asked questions about recording Facebook Livestream videos
How to Record Facebook Live Stream Videos for Free
Recording Facebook Livestream videos is an excellent idea, especially if you’re a gamer, sports fan or love attending live Ask Me Anything (AMA) sessions of your favorite content creators.
The easiest way to record livestream videos is using a screen recorder. Because they are versatile tools that will help you record, edit and share the recordings without complicating the process.
Which screen recorder should you use?
This is a slightly tricky subject to deal with because there is no dearth in the number of screen recorders in the market.
As a Mac user, you might prefer using QuickTime player, and honestly, it’s a great choice. But, we have written about its limitations that you should definitely consider before using the tool.
Windows 10 & Windows 11 users also have an option of using the built-in screen recorder Xbox Game Bar, but it has many shortcomings too. Like you can’t record the entire screen.
Our list of the best screen recorders to record Facebook Livestream videos
We have a list of favorite screen recorders that are the best based on their usability and feature list.
Depending on what OS you use, here’s a list that will help you pick the right tool -
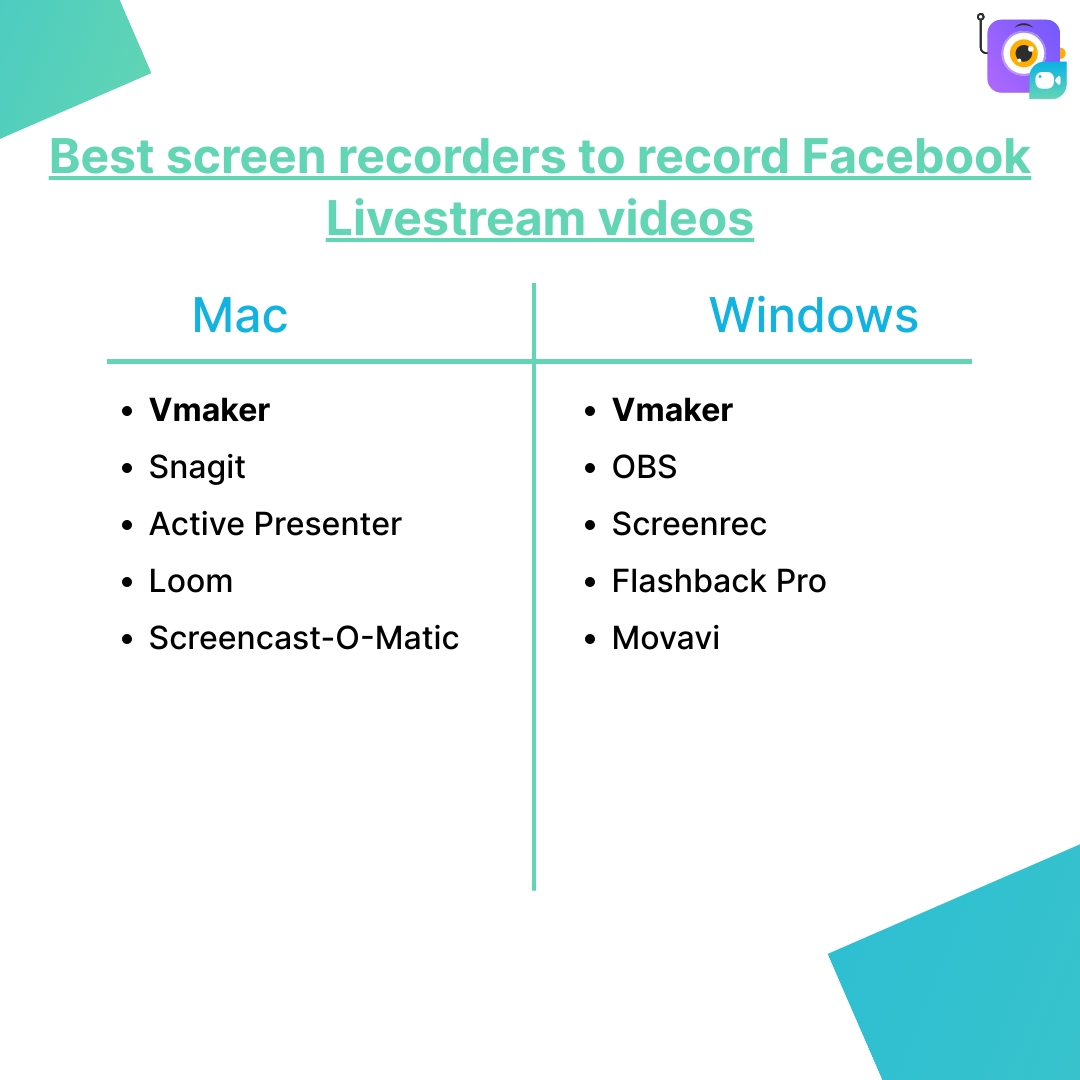
In the rest of the blog, we will show you how you can record Facebook Livestream videos using Vmaker. As you can clearly see from the table, Vmaker ranks among the best tools for Windows and Mac.
You can say that we’re beating our own drum here, but we deserve it. Vmaker’s pricing, usability and features are among the best in the industry. Follow the simple steps listed below to figure out if you agree with us.
Recording Facebook Livestream videos with Vmaker
To start using the Vmaker app you have to first download the application or sign up for the Chrome extension.
In this part, we will list down the steps of how you can download the app for Windows or macOS.
- Head over to the Vmaker website
- Click on the Sign-up now button
- Enter your username, email address and password. You can also sign up with your Google and Facebook account
- After you click on the Sign-up button, you will see a dashboard pop-up. Download the Vmaker Screen Recorder for Windows
- Follow the on-screen instructions to complete the installation
Getting started with Vmaker for recording Facebook Livestream videos
Congrats! You’re through the first step of recording a livestream video on Facebook using Vmaker.
Follow the instructions below to get started with recording your video.
Step 1: Open the Vmaker app

After you open the app, you will see an interface open like above
Step 2: Choose the recording mode
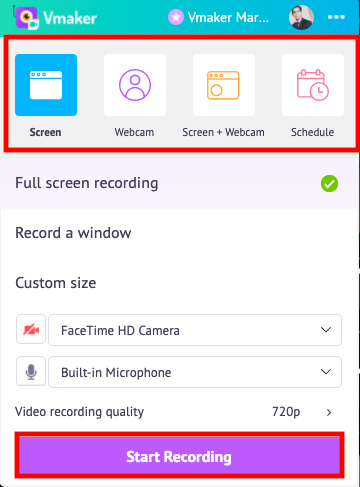
If you only want to record the livestream, then go for the Screen mode of recording.
If you want to do a narration along with the livestream, or you want to record a reaction video to the livestream, then Screen + Webcam will be a better option.
If you record in this mode, then please ensure that the Webcam and microphone access has been enabled.
Step 3: Choose the recording type
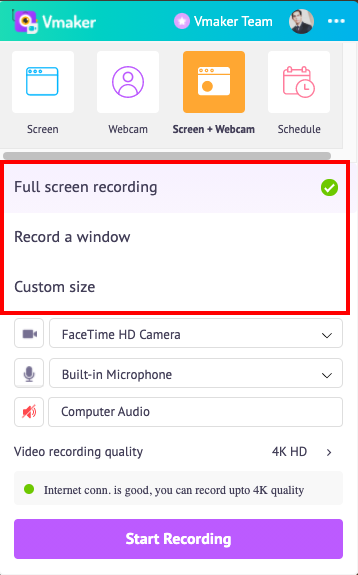
The recording types help you decide what gets recorded during the screen recording session.
In the full screen mode, all the windows that are open while recording will get recorded. For example, while recording if you switch windows and check your Gmail account, then that too will get recorded.
If you don’t want that, then open the Facebook Livestream in a separate window, and choose the Record a Window option.
With custom size, you can decide the region that has to be recorded, and Vmaker will only record that.
Step 4: Open the Facebook Livestream video
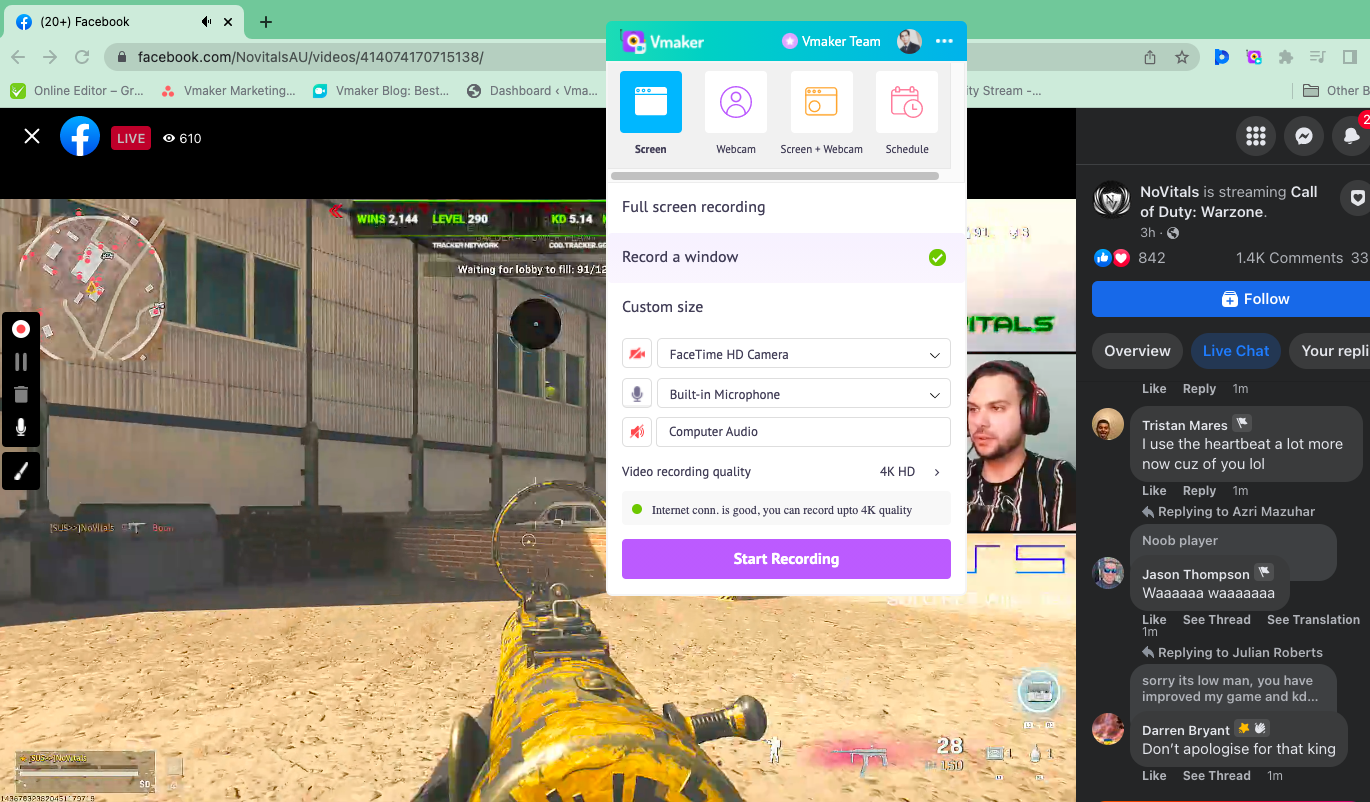
Choose the livestream video that you want to record. When you do that, you will see the Vmaker app appear like in this screenshot.
Step 5: Start recording the video
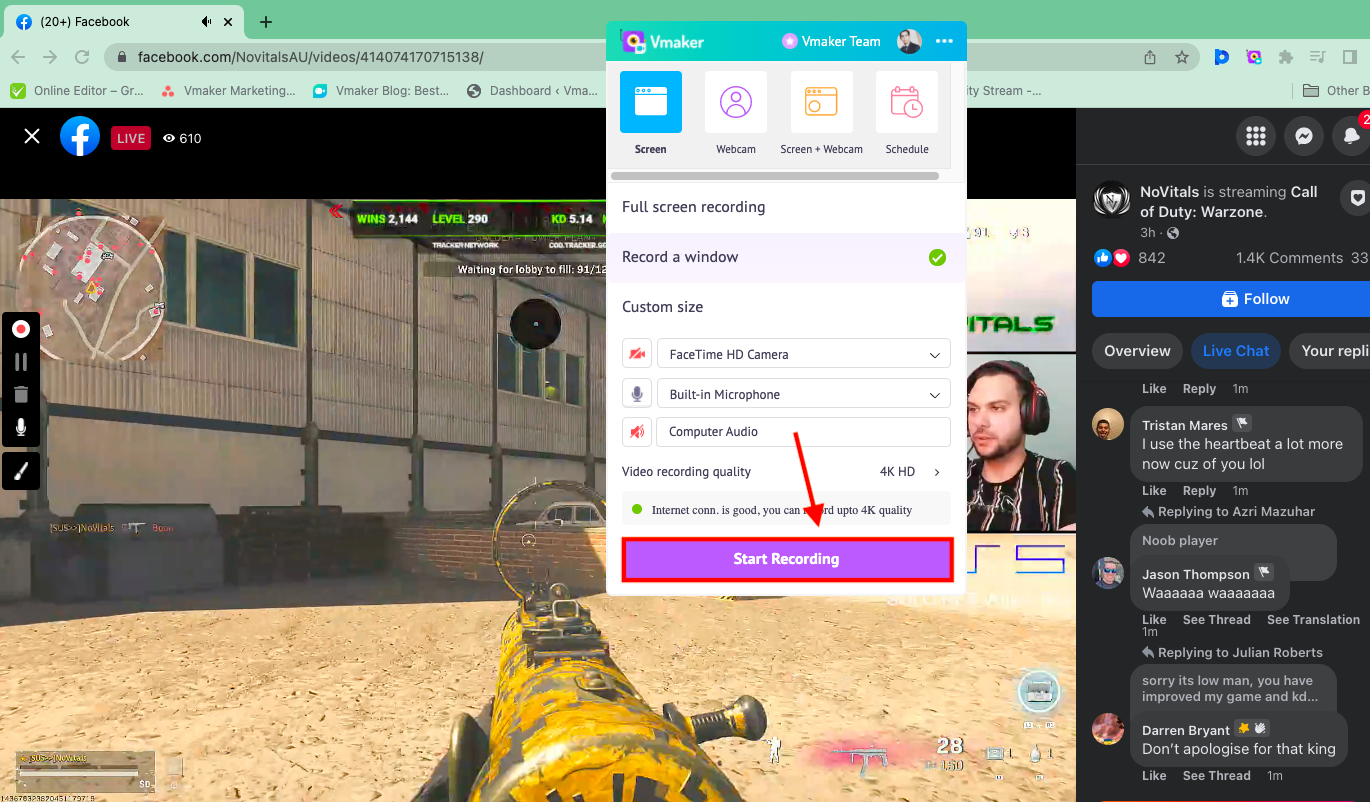
Now, you’re set. Click on the big Start Recording button to begin recording the livestream video.
However, before you start, check if all the options and settings are done correctly as per your preference. It’s better to be sure as livestream videos can go on for long.
Step 6: Stop the recording

To stop the recording, you can tap on the timer at the top bar of the window, or you can press the record button again that keeps floating on the left-hand side of the screen while you’re recording.
Step 7: Edit and share
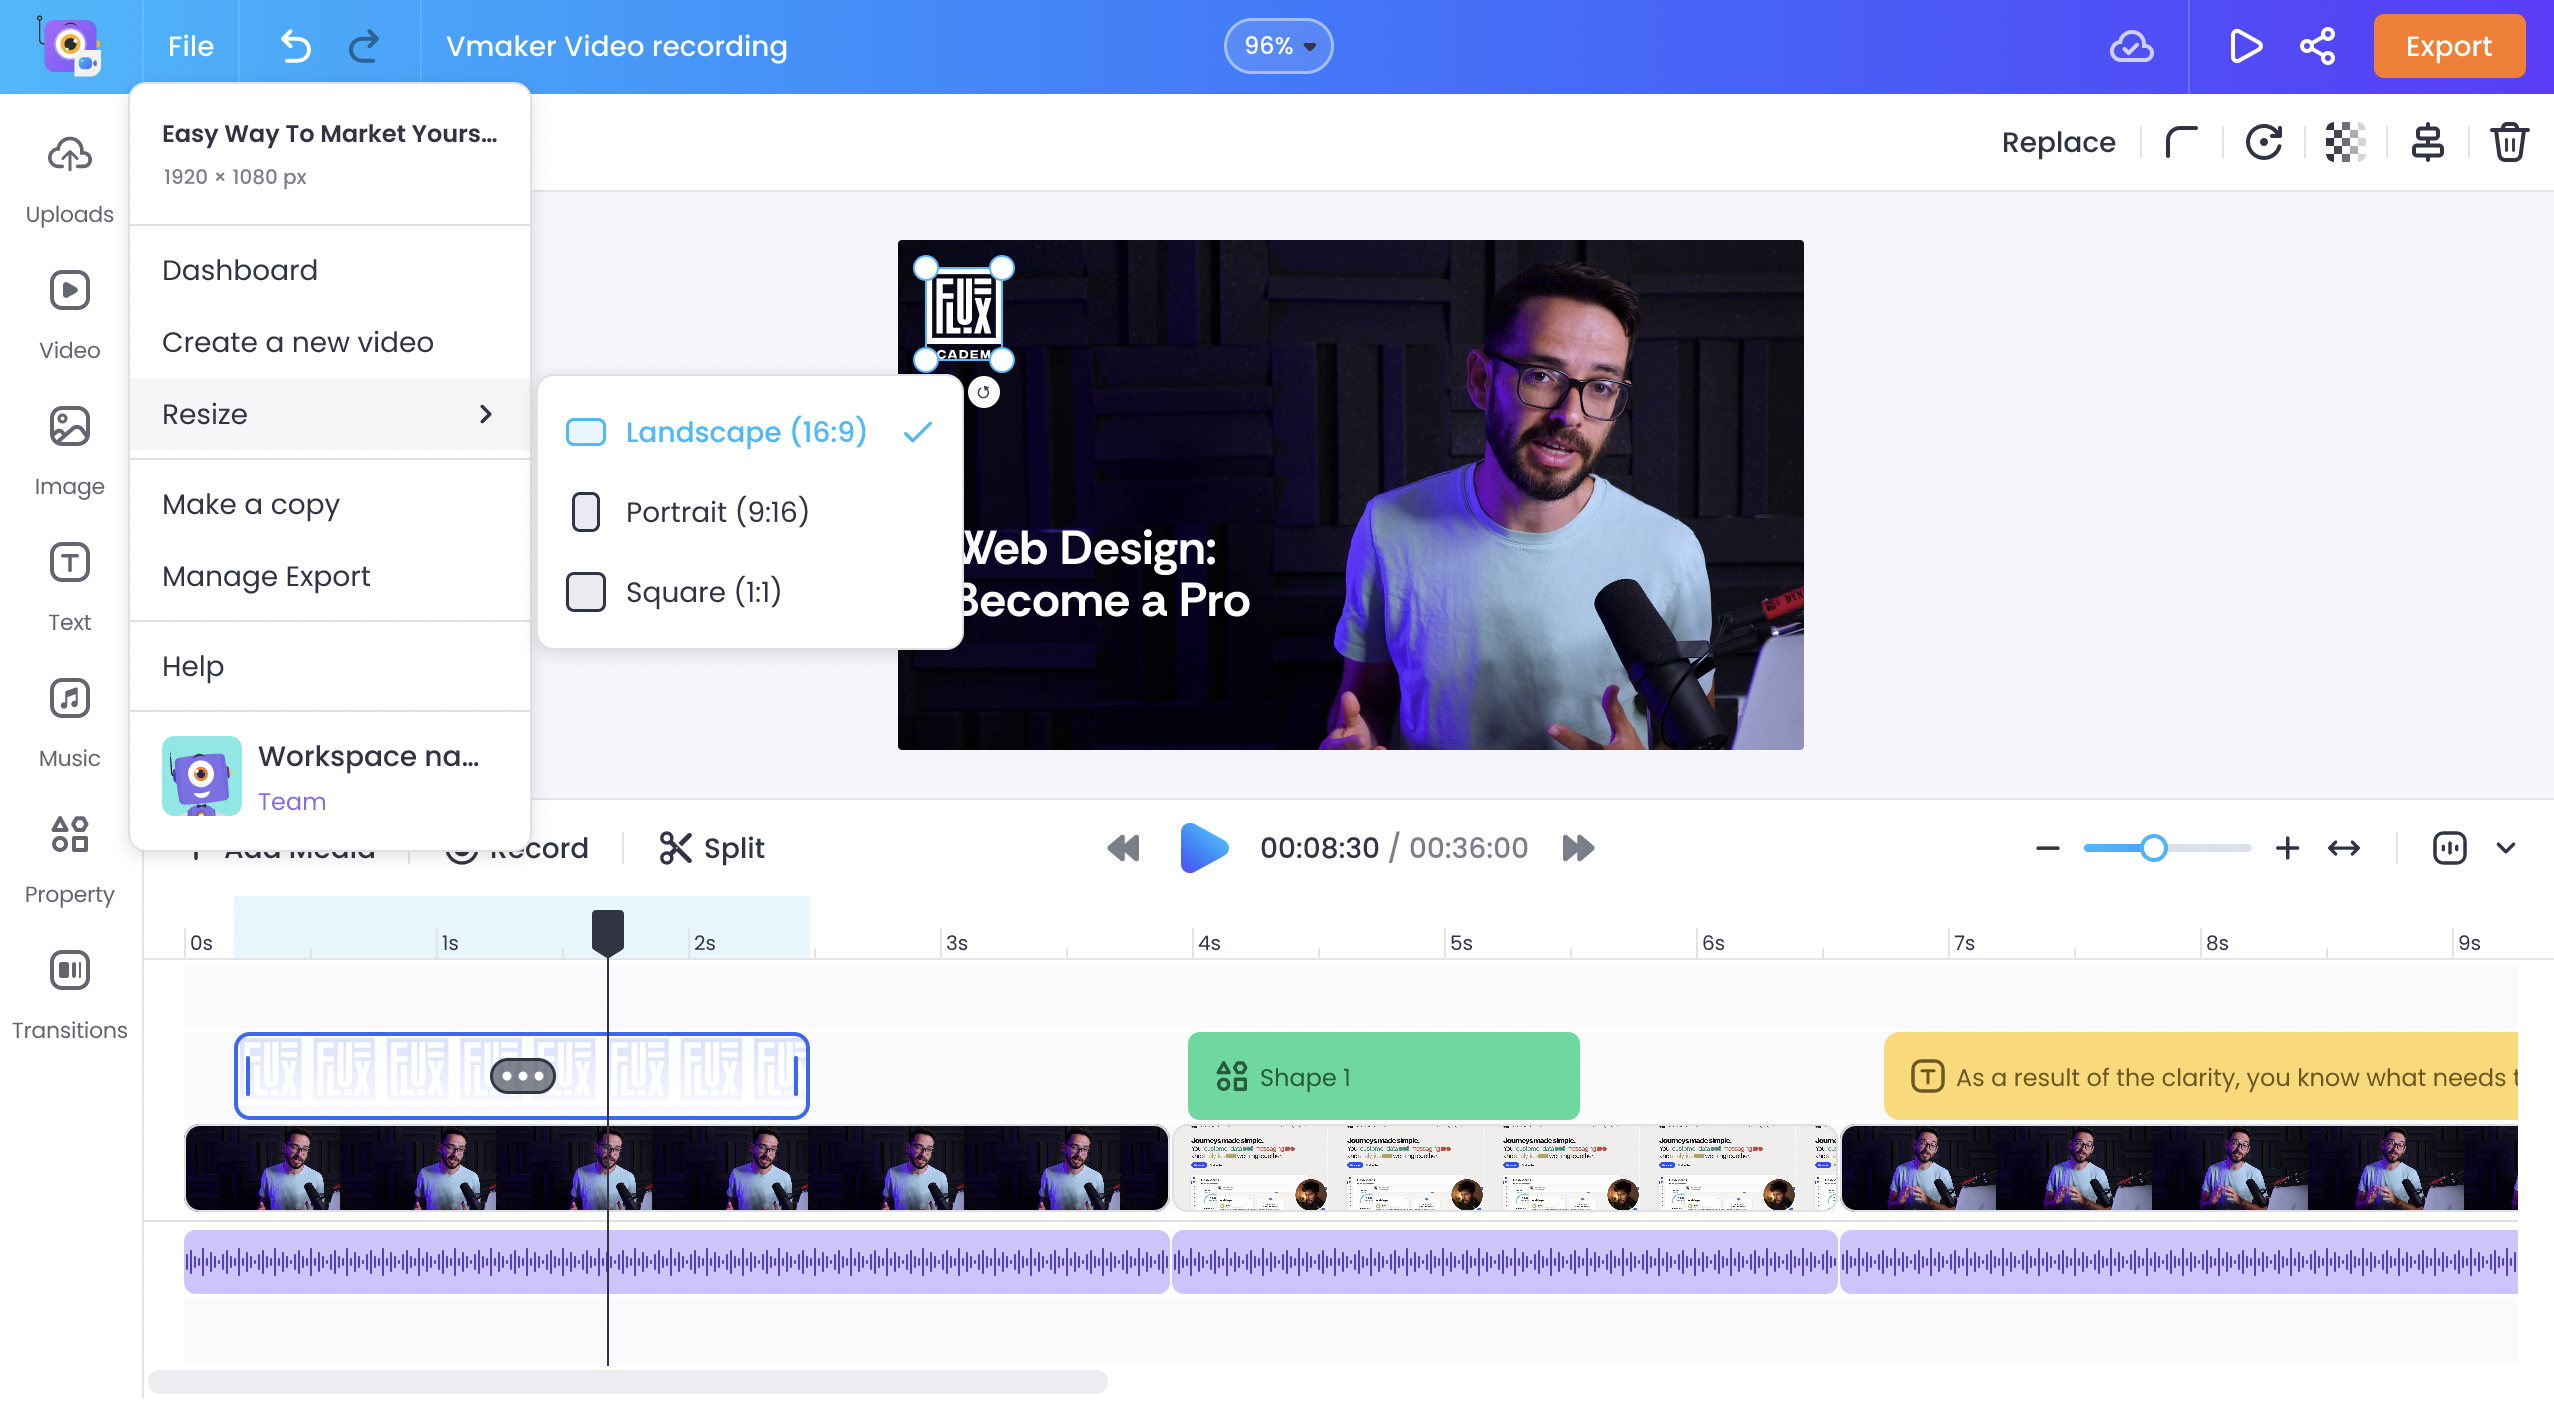
After you stop the recording, you can choose our AI video editing tool to auto-edit your recordings.
Vmaker AI is an AI video editor, the first of its kind, that transforms your raw videos into stunning creations in just one click.
It intelligently adds B-rolls, background music, intro animations with titles, outros, subtitles with text animations, stickers, and more, making your videos ready for publishing. The final video can be further refined using the full-blown video editor included in Vmaker AI.
The whole editing suite of Vmaker AI includes video cutter, video resizer, video merger, add text to video, add video to video, filters, color correction, video cropper, noise removal, video speed changer, and audio enhancer.
Record your first Facebook Livestream video
So that was all about recording, editing and downloading a Facebook livestream video.
Wasn’t that simple? With a screen recorder you can not just record a livestream video, but anything that plays on your Windows or Mac computer screen.
We recommend you use Vmaker, but that’s your choice. You can check the list we mentioned in this blog to pick the best screen recorder for you.
Frequently asked questions about recording Facebook Livestream videos
1) How to download a Facebook live video?
The person hosting the live video can download the livestream video. As a user, if you want to download the video, then you have to use a screen recorder like Vmaker.
Please note that we do not support or encourage recording copyrighted videos.
2) How to save a Facebook live video to your computer?
If you’re not the host, unfortunately, you can’t do that. You have to use a screen recorder to record the livestream video, and then download it from the dashboard.
3) How to upload a Facebook live video to YouTube?
Facebook will not allow you to upload a livestream video to YouTube directly. A screen recorder can help you do that. Record the livestream video, edit it and click on share button to upload it to YouTube instantly.
Try Vmaker for this as it’s simple to use and doesn’t take a lot of time to get this done.
Now that you have learned how to record Facebook live stream videos go ahead and start recording them using Vmaker for free.
If you enjoyed the above article, then here are a few more cherry-picked ones for you to read further!
Ultimate Tutorial videos Guide with Tips and Free Template
Ultimate How-to Video Guide with Examples, Tips, and Ideas