Contents
What webcam software is the right one?
But, how to choose a screen recorder?
Webcam recording with a screen recorder - Step-by-step process
The best tips for recording webcam video
Start recording your webcam video
An Ultimate Guide on Webcam Recording
Recording videos from a webcam can be useful in different ways. You probably know this, that’s why you’re here. But, it’s tough to start recording on a webcam. There are so many showstoppers to keep you away from getting started -
What webcam recording software is the right one for you?
How to record a webcam video?
How to make a quality webcam recording video?
We will be handholding you through all of that information. But, if you’ve already made up your mind about using a screen recorder to record video with webcam, and you’re here only for the process - you can scroll down a bit to get a detailed walkthrough of that.
What webcam software is the right one?
There is no easy, straightforward way of answering this question. But, hold on, it’s also not that tough either.
Let’s start with the basic - Why do you want to record webcam videos? You just want to learn it? Or do you want to use webcam recordings in tutorial videos? Or is it for both? This is the first and the most important, because this decides what type of webcam recorder is the right one for you.
If you only want to learn to use a webcam recorder, then you’re better off with the webcam installed on your computer. You can also use an external webcam, it’s simple plug and play mechanism.
But, if your purpose is broader, like using webcam recordings for YouTube production, video feedback, tutorials, answering support questions, then a screen recorder will be a far better choice.
Screen recorder software can record webcam, screen, audio and has a tonne of interactive features that will make your video a lot more engaging to watch.
But, how to choose a screen recorder?
Using a screen recorder for recording webcam video is more fruitful in the long term. But, for this to happen, you have to pick the right screen recorder for you. There are ample of choices, but with this 5-point practical list, you can evaluate screen recorders, and then choose the best one for you.
Compatibility
You cannot skip this part if you want to use a screen recorder. Because not every screen recorder is compatible with every operating system. A screen recorder made for macOS will not work on a Windows PC and vice-versa.
💡 Tip
You can also check out our detailed analysis of the best screen recorders for Windows and best screen recorders for Mac.
Features
In most screen recorders, there is a mix of basic and advanced features. Basic features will have all the necessary elements. Whereas in advanced features you get more options to customize your recordings and usage experience. We suggest making a list of features that you’ll absolutely need regularly. These features are the must-haves in the screen recorders that you’re evaluating. You can eliminate the ones that do not have these features.
Pricing
Having a budget in mind will help you to filter your choices wisely. Because there are free as well as paid options available. Take out the list of features that you prepared in the last step. You already have a shortlist of screen recorders. Compare their pricing based on your list of features. The ones that provide the maximum value for your budget are qualified for the next round.
Reviews
While you have a comprehensive list of the best screen recorders, you don’t have any social proof. Social proof is a psychological phenomenon where one learns from others’ actions. In this case, the reviews and testimonials given by the current users of screen recorders will tell you a lot about using the tool. You should be specifically focusing on how users benefit from using the screen recorder, how prompt is the customer support team and is there anything specific they dislike about the tool.
Hands-on experience
All the above factors will give you a lot of clarity on which screen recorder will be the best for you. But, don’t make your decision yet. Most screen recorders have a free trial. Use this to your benefit. Create an account, and play around with the features. Keep a track of how much time it takes you to record a video, edit, download and export it. How easy it is to jump from one screen or feature to another. This will give you the best experience of using the tool on a daily basis. The one that is the easiest to use, should be your pick.
Webcam recording with a screen recorder - Step-by-step process
In this part of the blog, we will show you how you can make a webcam recording using Vmaker. Because Vmaker is a free screen recording tool, you can also get hands-on experience of using it by simply following these steps.
But, before we get to that, here’s how you can download the Vmaker app -
1) Head over to the Vmaker website
2) Click on the Sign-up button in the top right corner
3) Create an account using your Gmail or Facebook credentials
4) After you have signed up, you will see this screen:

5) Click on the Download Vmaker button. Choose your operating system and download the app.
After you have followed the above steps, you’re ready to make a webcam recording using a screen recorder.
Open the Vmaker app
You will see a screen like this -
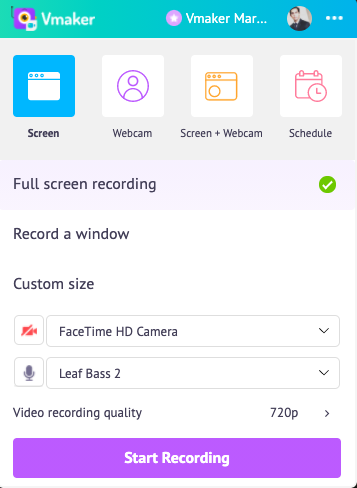
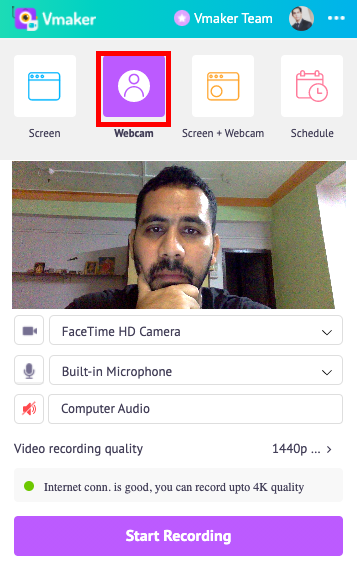
Click on the webcam record mode
The webcam record mode only records the webcam. Once you’re ready to record, click on the start recording button.
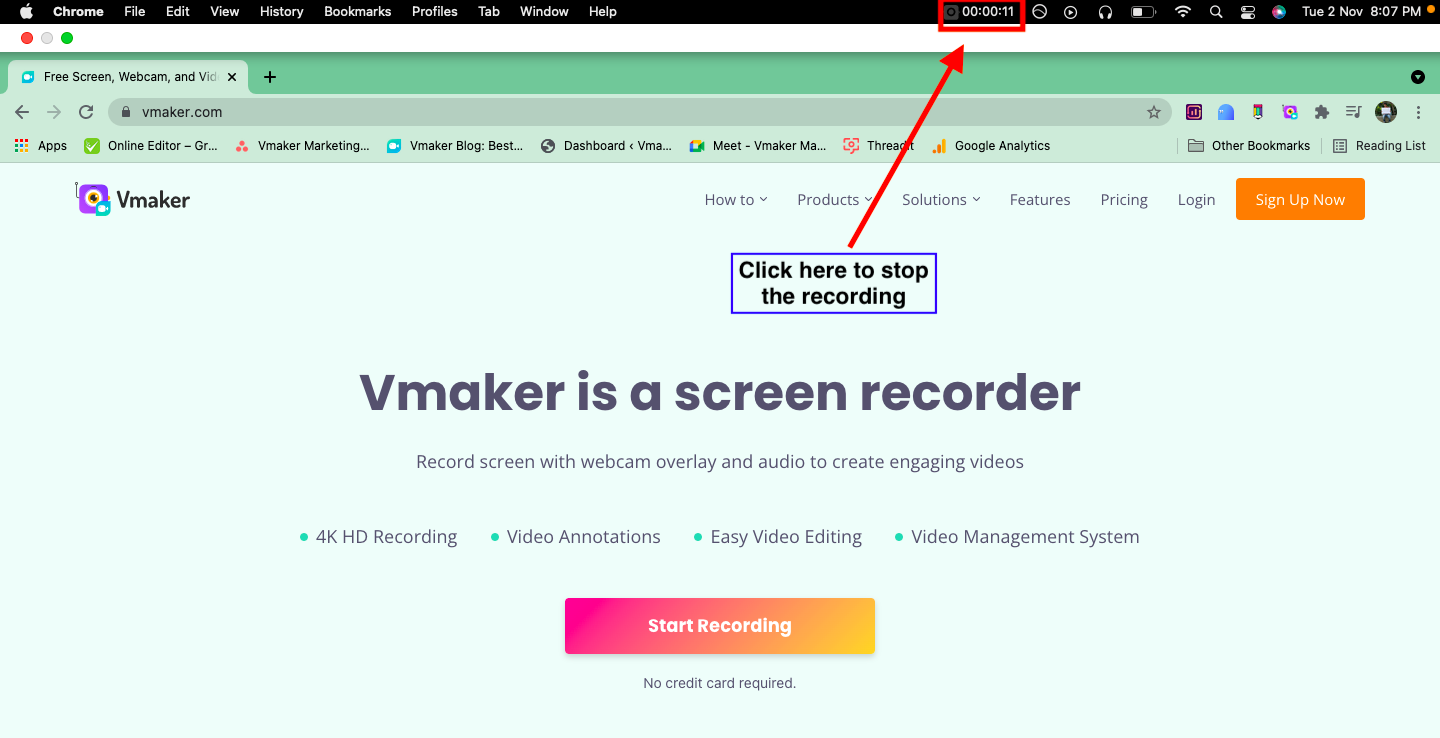
Stop recording
To stop the recording, you will see a timer at the top of your screen. Once you click on it, the webcam recording will stop. The recording will automatically get uploaded to your dashboard
Edit the recording
With Vmaker’s AI video editor, you can edit and improve the quality of your recording. You don’t have to be professional or experienced in this. The editor page looks simple enough for anyone to get started.
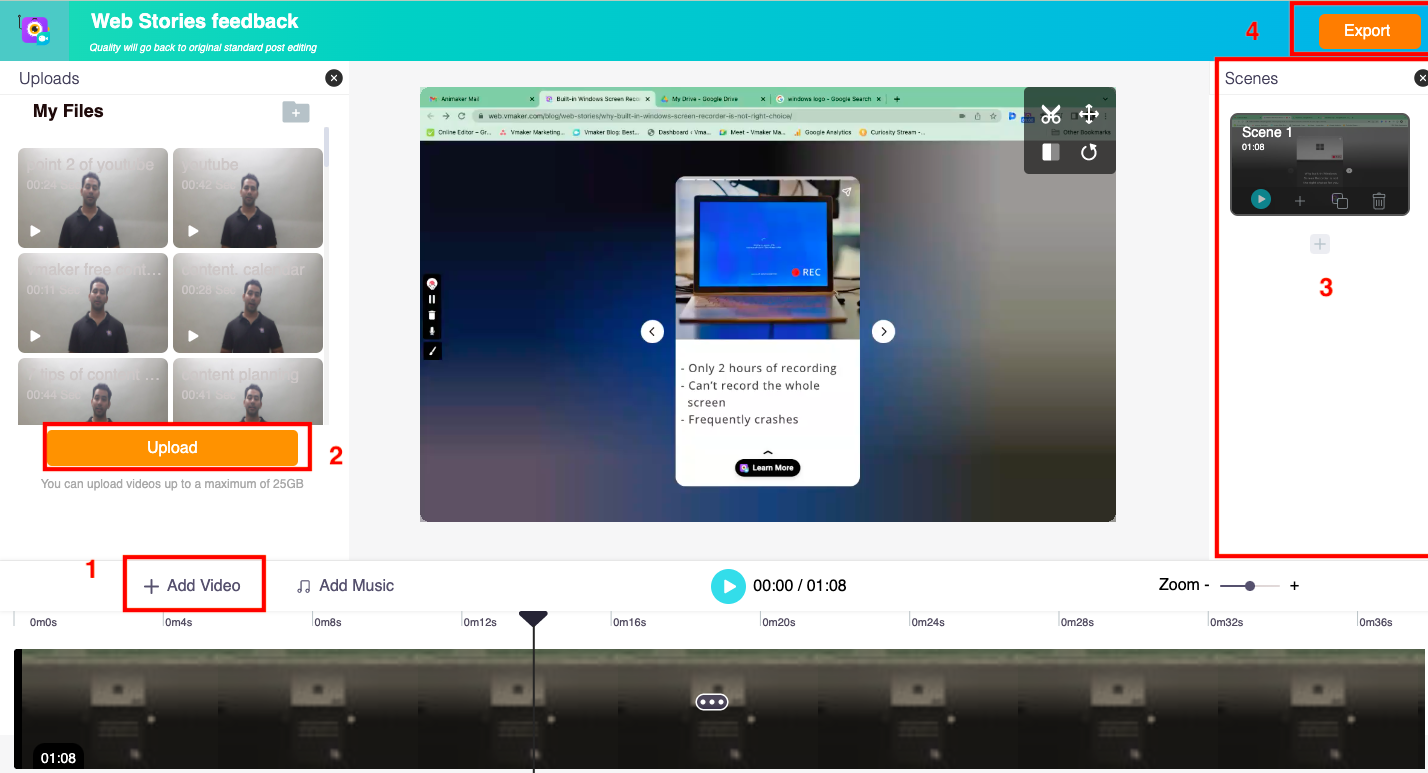
There are three features of Vmaker editor that you shouldn’t miss using when editing your webcam recording -
Trim - You might not get the perfect webcam recording at the first go. The trim feature lets you cut out the unwanted parts of the recording. You can choose which part of the video should be visible by moving the sliders placed just below the recorded video.
Upload - If you want to upload more recordings along with your webcam recording video, then you can easily upload them with this feature. Choose the video that is already saved on your desktop, upload it and Vmaker will automatically add it with your webcam recording.
Scenes - This feature brings all your content together and helps you to form a story or a chronology that your audience can easily follow. With scenes, you can drag and place the recordings as per your own goal. After you have got everything right, you can tap on the Export button to get the final version ready.
The best tips for recording webcam video
If you think you cannot go wrong with a webcam recording, think again. There are some basic practices that you should follow while recording using a webcam. There’s no harm in remembering these tips the next time you sit in front of a webcam.
Camera setting
When you sit in front of the camera, make sure that your eyes are at the same level as the webcam. This will help you look straight at the camera and not anywhere else. The biggest advantage of doing this is that your audience will feel that you’re talking to them directly. This way you will get their maximum attention.
Background condition
In a webcam recording, your audience can clearly see what’s in the background. Therefore, it’s important to focus on that. If you have an open window with strong sunlight coming through in the background, then they will see a silhouette of your face. Which you do not want to have. Take extra steps to keep the background clean. If it’s littered or disorganized in some way, it will distract the viewer too.
Do not worry even if your background is messy. Use Vmaker's AI video background remover to eliminate your messy video background, and you can change to a professional-looking background from 10 million stock media options.
Lighting effect
You have to arrange the minimum lighting set up for your audience to see your face clearly. Apart from what we said about the background light, make sure that room is well lit. If the room is still dark after switching on the wall lights, place at least one light on your desk directly focusing on your face.
Sound check
Your computer speakers should be able to catch your voice when you’re speaking. But, if you’re in a public space, it can catch a lot of unwanted noise. Your best bet is using a mic. If you’re recording in a screen recorder like Vmaker, you can also mute the background sound in a single click. This further accentuates the quality of your voice in the recording.
Script and outline
When you have an outline and script for what you’re going to say in the video, you have a direction. Your script can just be pointers if you don’t want to spend a lot of time writing it. But, even doing that little bit is going to improve the video quality. Your audience will get attached to the flow quickly, and not be left scratching their head.
Time limit
Your webcam recording can go as long as you like, but if you want the best engagement, we suggest keeping it succinct. Your audience might be busy or have a very low attention span. Keeping the video to the point is a safe way of foolproofing it from getting ignored by your audience.
Start recording your webcam video
This guide has everything you need to start recording your webcam video. You might not get it perfect at the first go, but that’s not a big deal. Once you’ve tried it, you will get better with the process.
Before you start, here’s a quick reminder : start by identifying the right tool for recording the webcam video. A screen recorder is a great option, but choose the one that works best for you.
Recommended Readings:
10 Best Free Webcam Software for Windows 7, 8, 10 & 11
Tips and Tricks for more professional-looking videos using Screen & Webcam recording tool
Learn Everything You Need to Know About A Webcam Recording Software
How to Record Gameplay on PS4 with Webcam and Voice Narration