Contents
What is multilingual subtitle?
1) Adding multilingual subtitles using Vmaker AI
How to Add Multilingual Subtitles to your videos with use cases
There are two scenarios where adding multilingual subtitles to a video offers an immense amount of value. One, when you want to translate a foreign language video into your native language.
Two, when you want to translate your own video into a foreign language.
If you’re here for one of these purposes, then we promise that you will find this blog useful. Because we’re going to show you a multilingual subtitle generator that is perfect for your needs. It can translate subtitles in 100+ languages automatically.
On a sidenote, if you’re here because you only want to add subtitles to videos, then this blog is good for you too. Hang on till the next section.
What is multilingual subtitle?
Subtitles are the text version of the speaker’s dialogues. A subtitle becomes a multilingual subtitle when it is translated into more than one language. For example, you screen record a video for your international clients. You use your own script as a subtitle for your native language.
You approach three different language experts to translate the subtitles in Spanish, French and German. So, now you have multilingual subtitles for your video. Your clients can watch the video in any of the four languages.
But, this process is time-consuming and costly. Instead of hiring translators and blowing your budget, you need an AI multilingual subtitle generator tool. Let’s talk more about it.
Using an AI tool to generate multilingual subtitles
Let’s get to the exciting part. In this part of the blog, we will show you how you can generate subtitles for your or others’ videos. And how you can translate them in different languages with the help of AI.
To further improve the accessibility of your video content, consider utilizing advanced tools that transcribe audio to text. By incorporating state-of-the-art transcription services, you can convert spoken words in your videos into written text, opening up opportunities for broader audience engagement.
You can Generate Subtitles using Two AI Tools
1. Vmaker AI Video Editor
2. Animaker AI
We have come up with three different use cases where multilingual subtitles can be the most valuable - adding multilingual subtitles to screen recordings, livestream videos and online meetings. Having said that, there are endless possibilities. The AI subtitle generator tool will work with any form of video recording.
1) Adding multilingual subtitles using Vmaker AI
A screen recorder is one of the best ways of making videos. There are tonnes of use cases where it’s highly capable of recording videos with great quality. It’s a godsend tool for someone who wants to make quick videos, but has limited training in it.
Step 1: Record your screen
Using a screen recorder like Vmaker, you can record your screen and webcam simultaneously. With features like Screen Annotations and Mouse Emphasis, you can stress your points effectively.
Using the Blur option, you can hide any sensitive or confidential information while recording your screen. After you end the screen recording session, you’ll be taken to a player page like this:
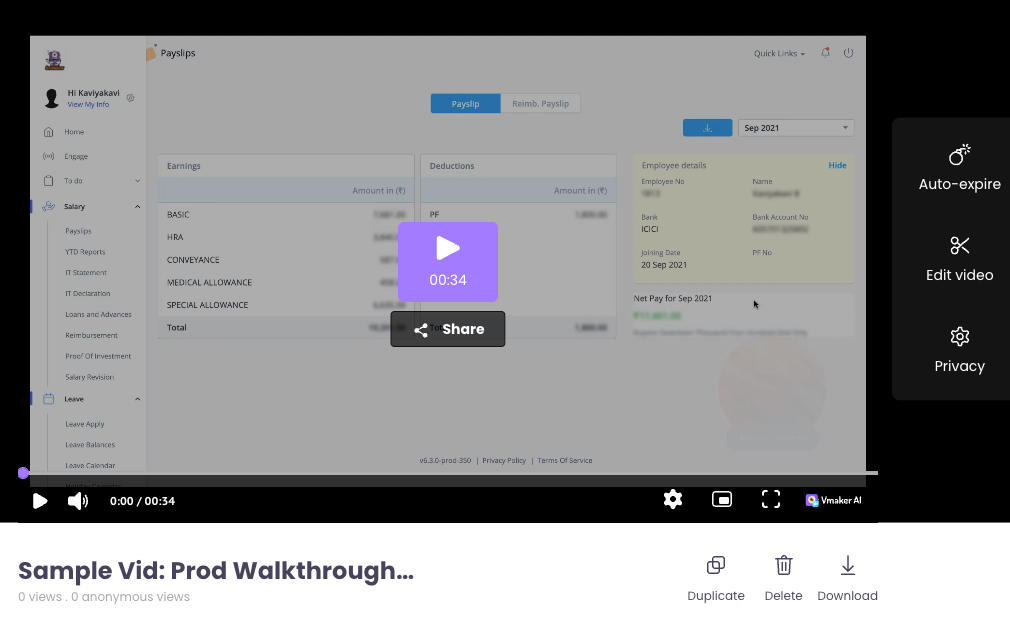
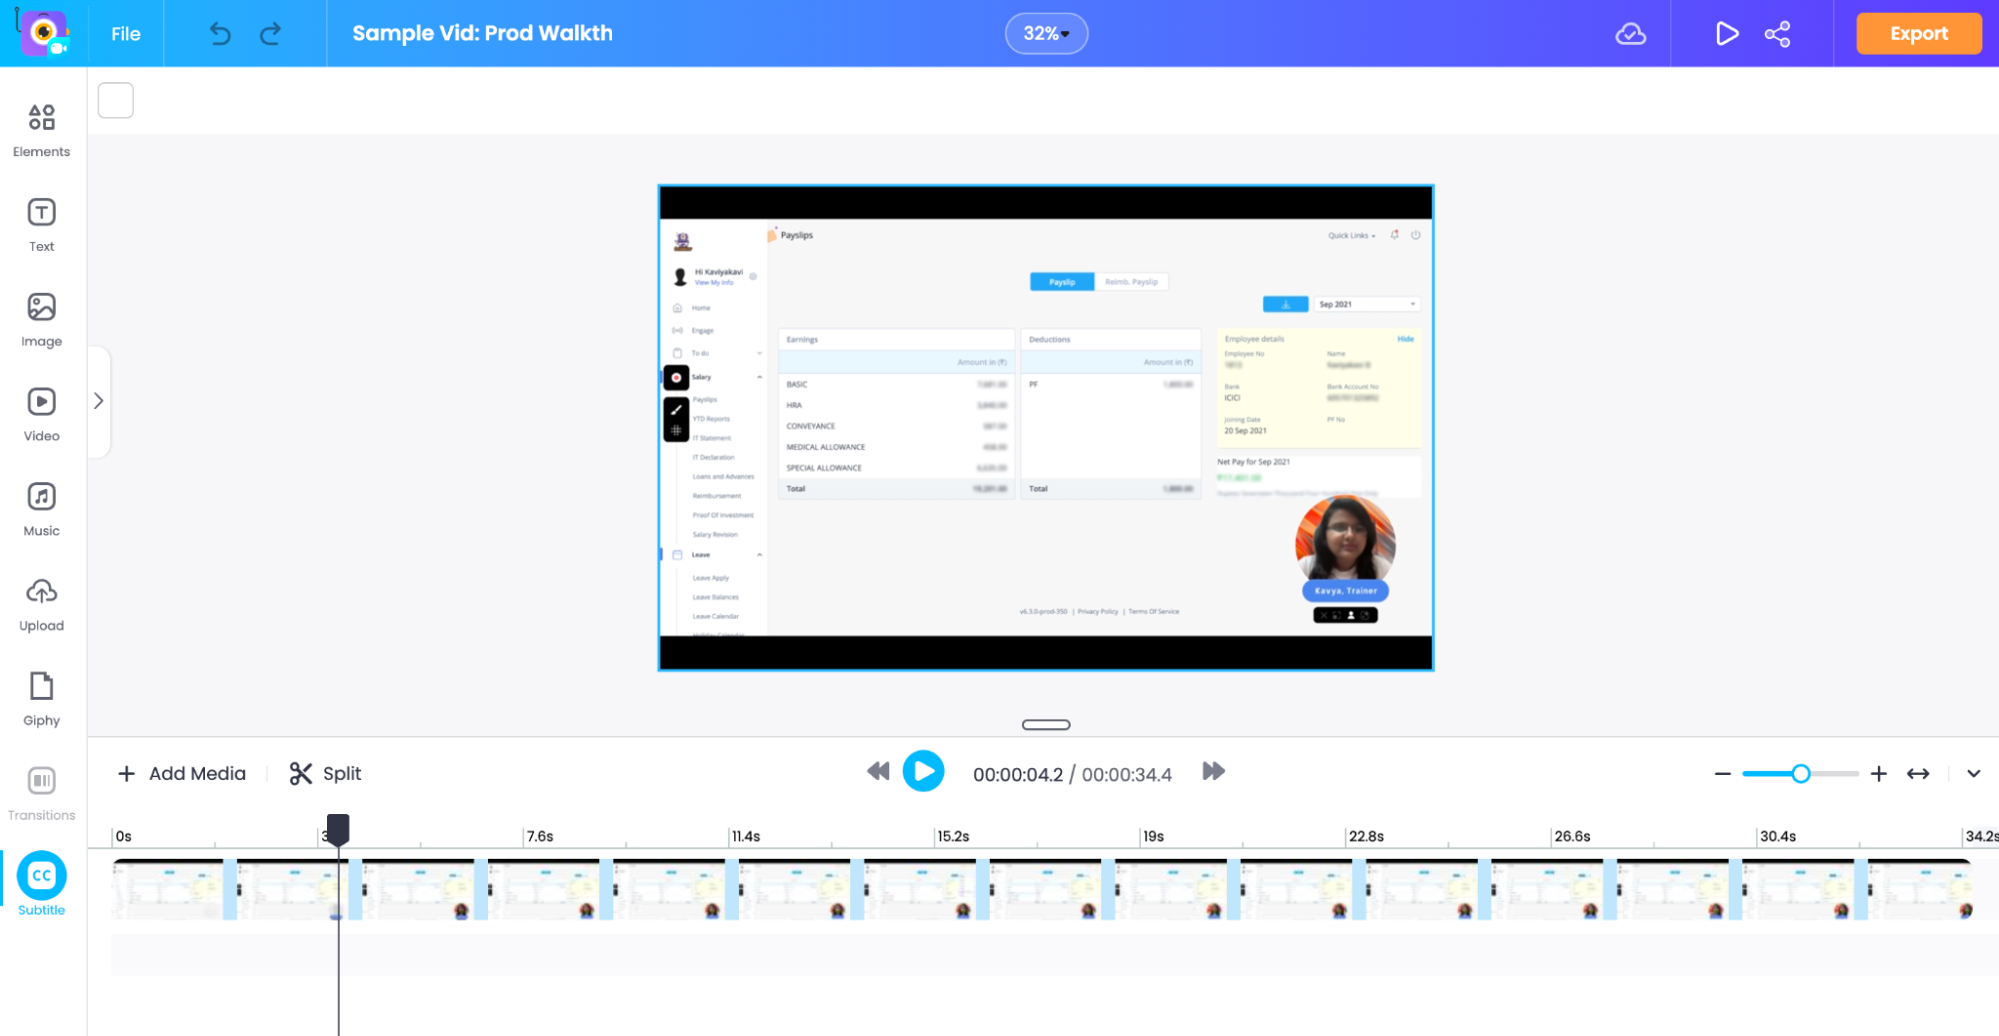
Once you click on the Edit Video button on the right menu, you’ll be taken to the Vmaker AI Video Editor and the canvas looks like this:
Step 2: Add Subtitles
To add subtitles, you have to click on the Subtitles button on the left bottom corner as shown in the picture below.
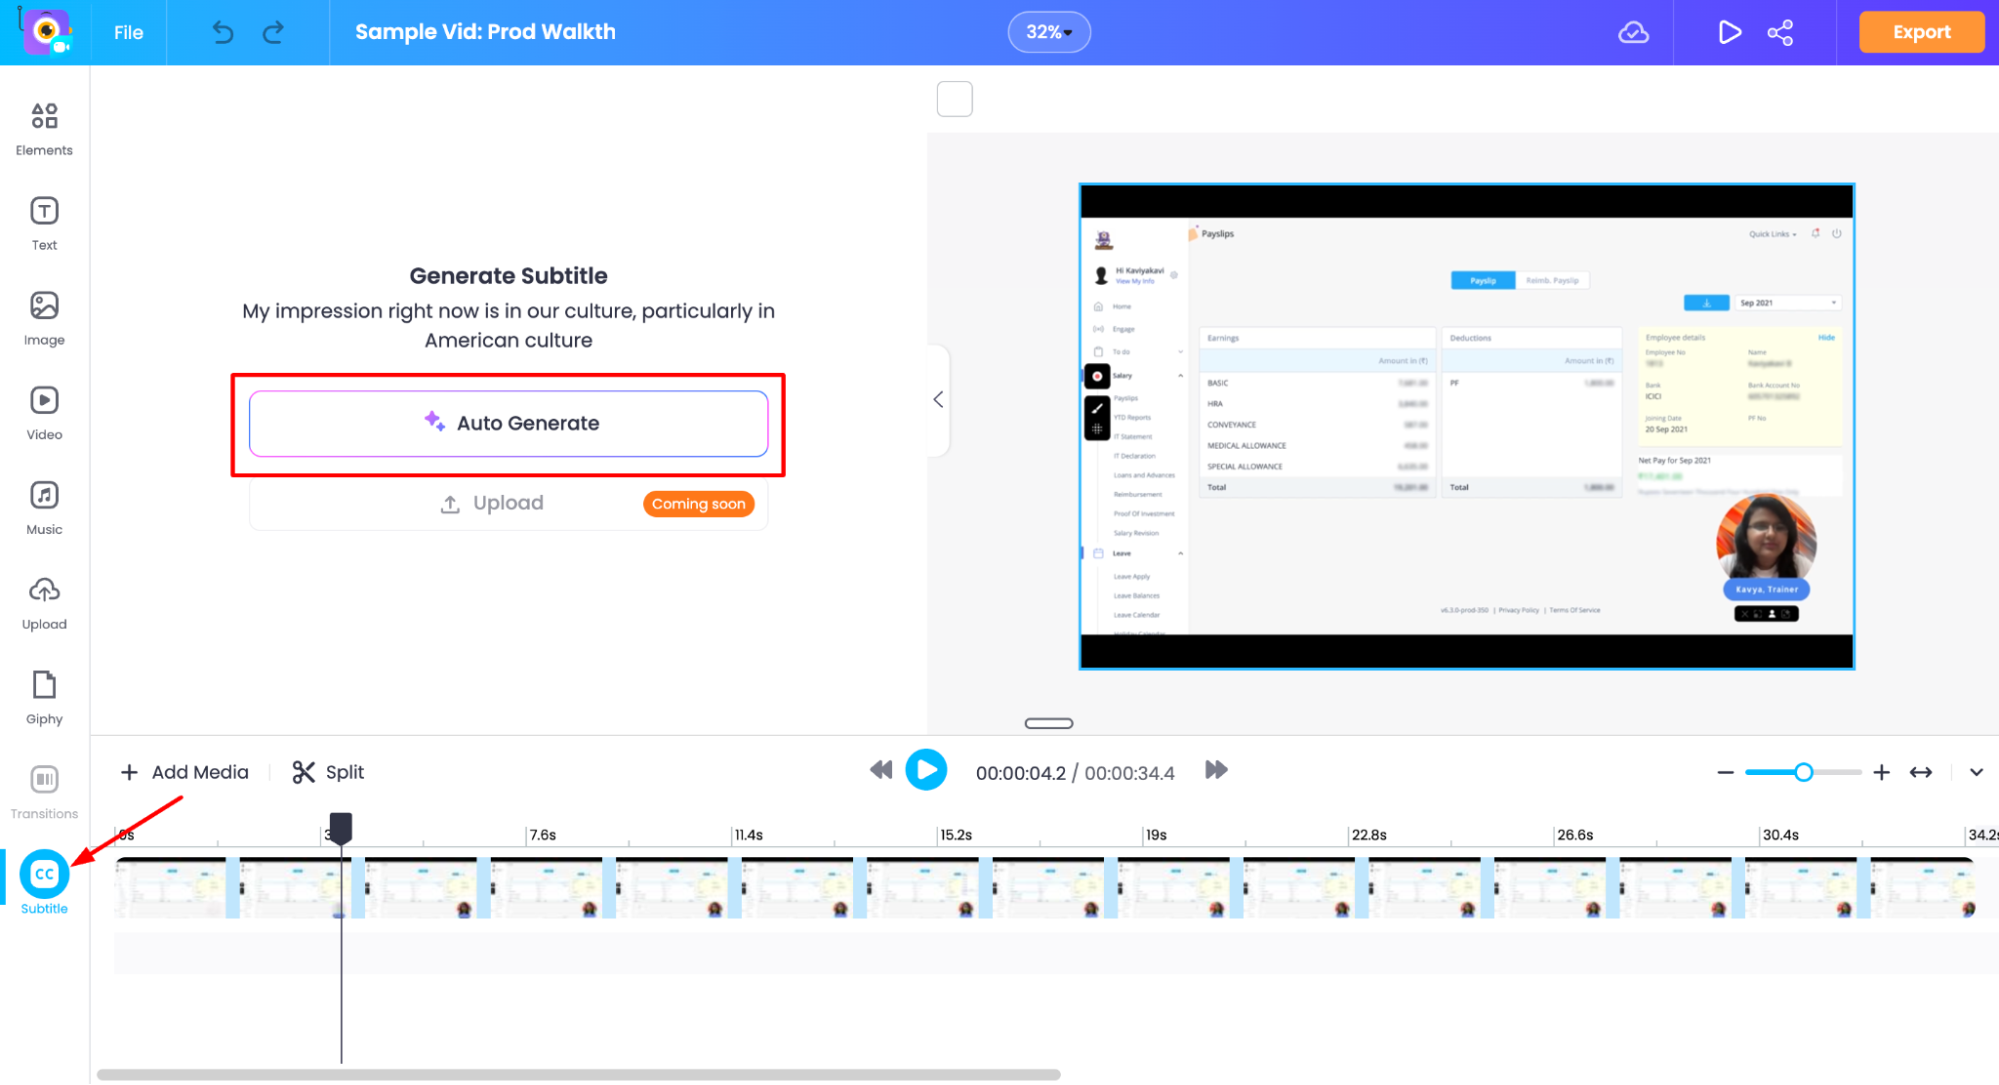
Once you click on the Subtitles button, a slide opens up with two options. Then, you can click on the Auto-Generate option.
Vmaker AI starts to generate subtitles in the videos native language. It can detect and transcribe upto 35+ languages.
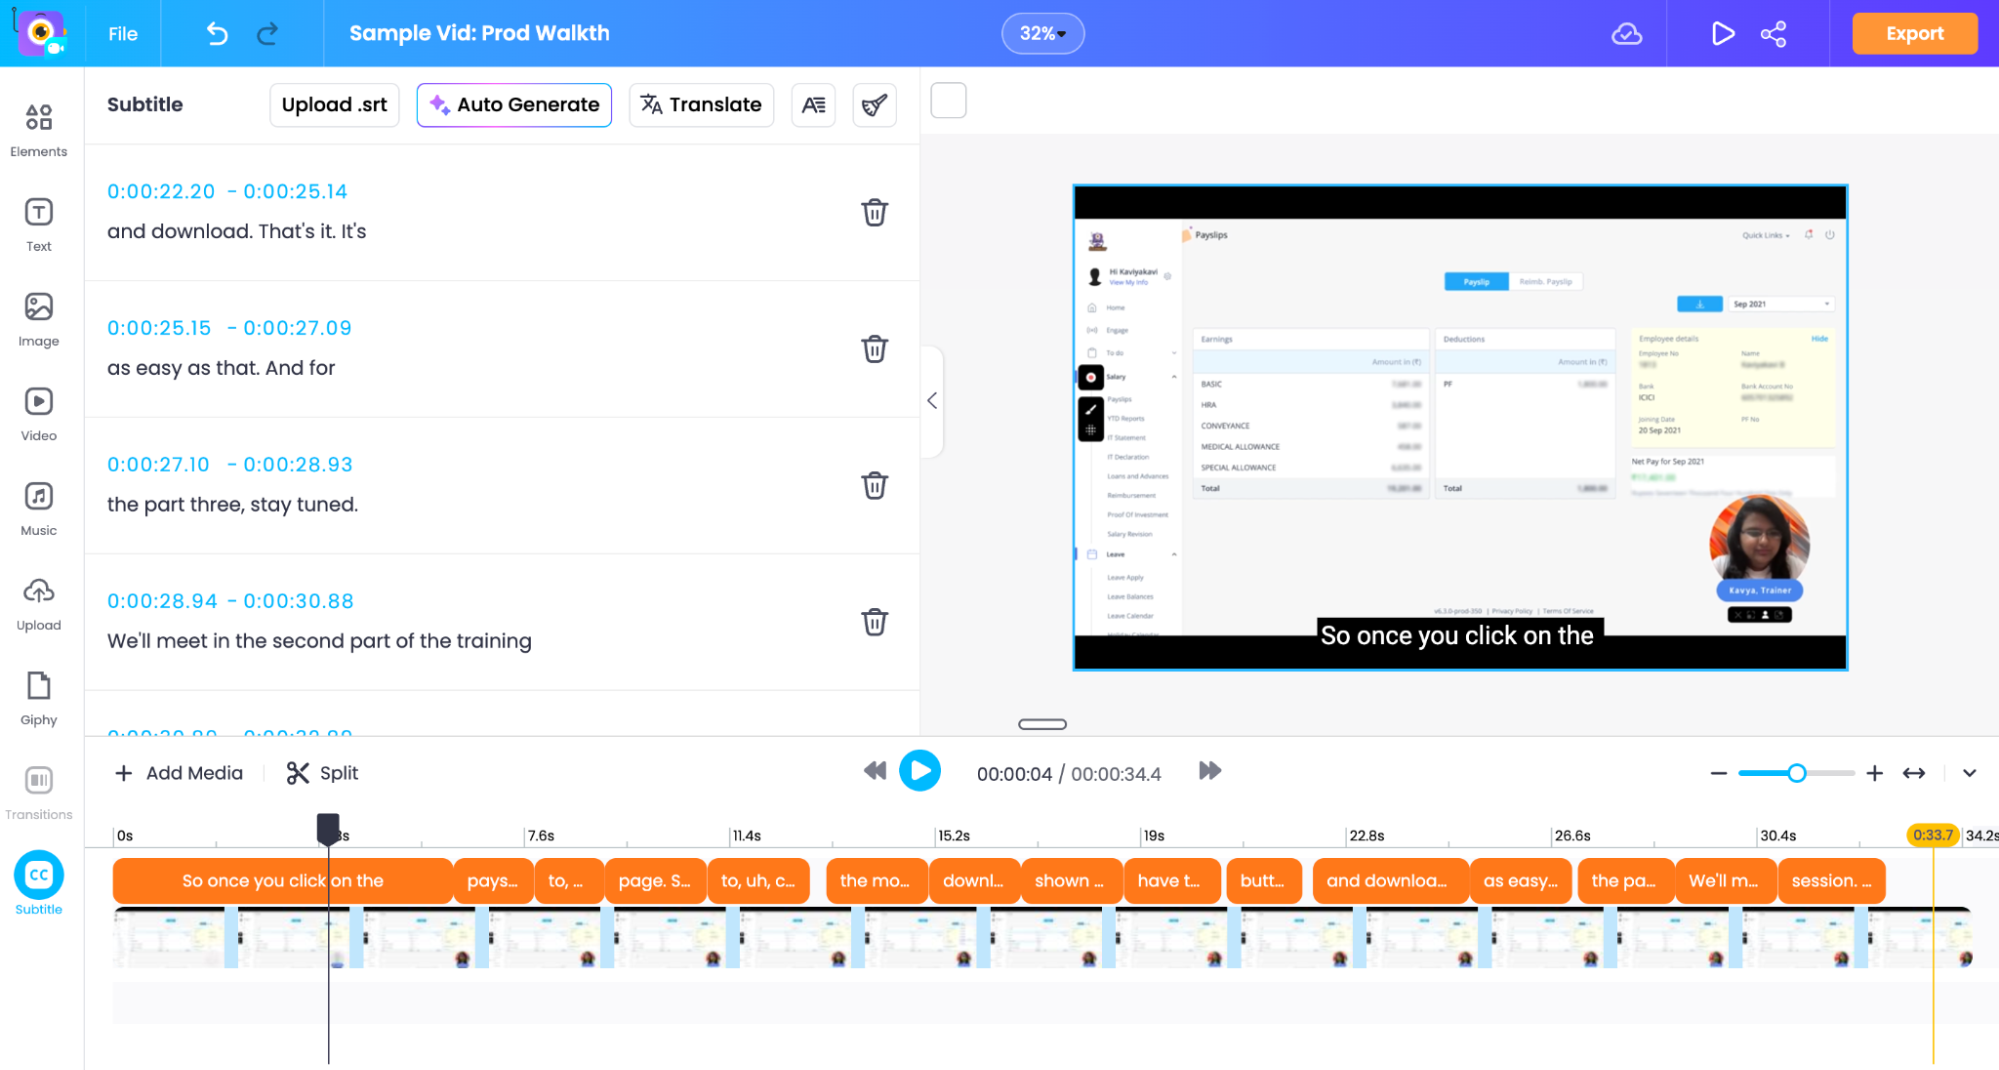
Vmaker AI removes the fillers in the subtitles. But if you want to make some changes and tweak your subtitles, you can manuall edit the text or adjust the time frame.
Step 3: Customize your subtitles
Not just this, you can also customize your subtitles style as you like. Once Vmaker generates the subtitles, all you need to do is click on the Subtitles Styles button and then customize the style of the subtitles.
You can also manually increase the text size, pick text colour, and change animation under the Edit Styles tab.
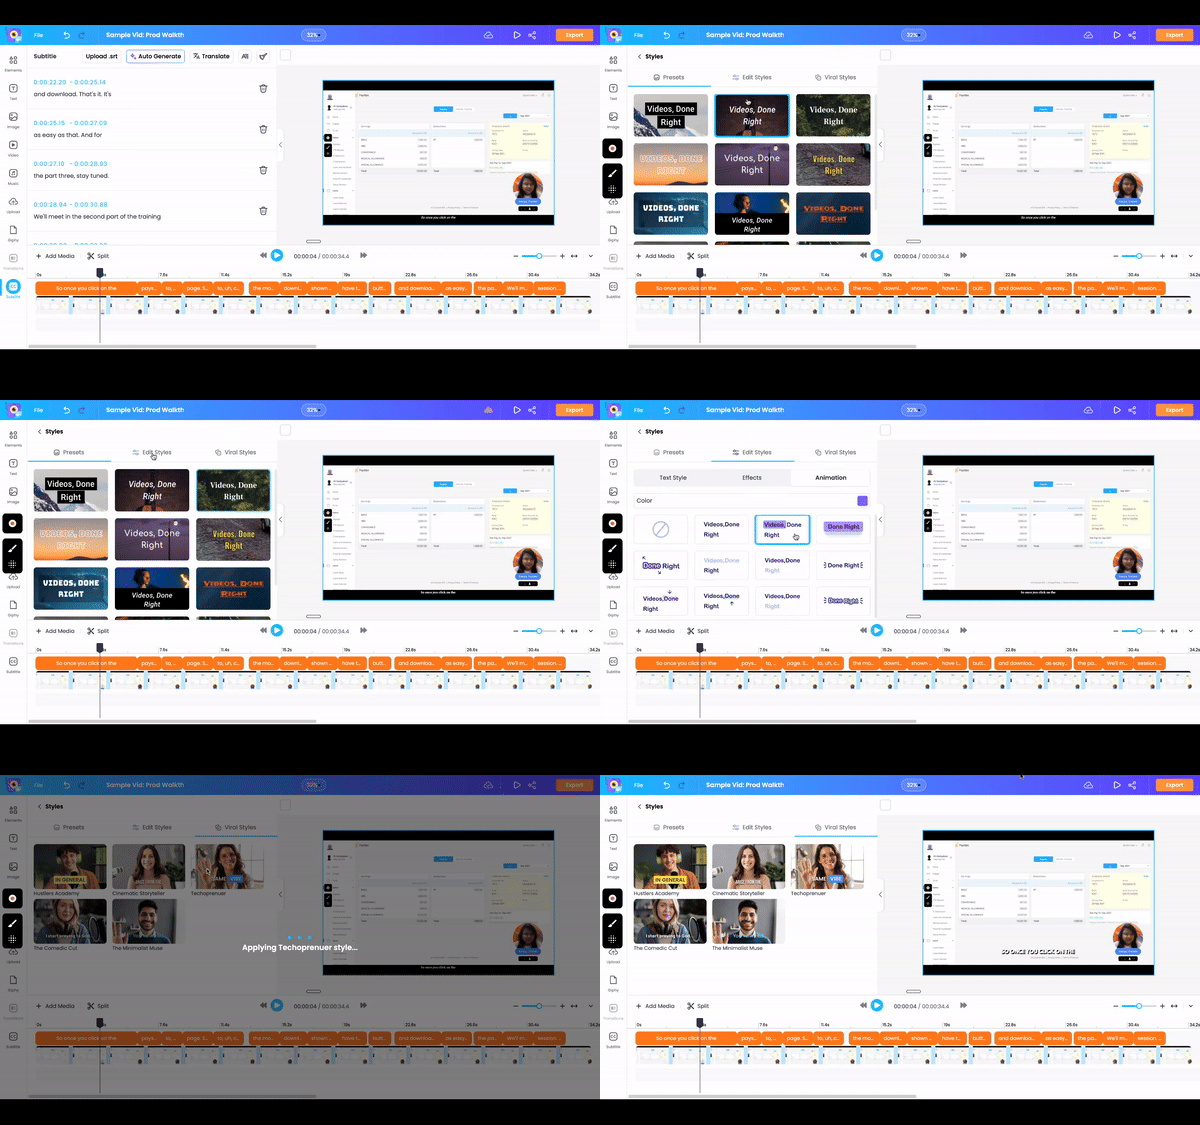
Vmaker AI also has the option to translate your subtitles and it’s launching soon!
2. Use Animaker AI:
After you have made your screen recording video, download it, and follow the steps below:
i) Create an account in Animaker. Use this Sign-up link
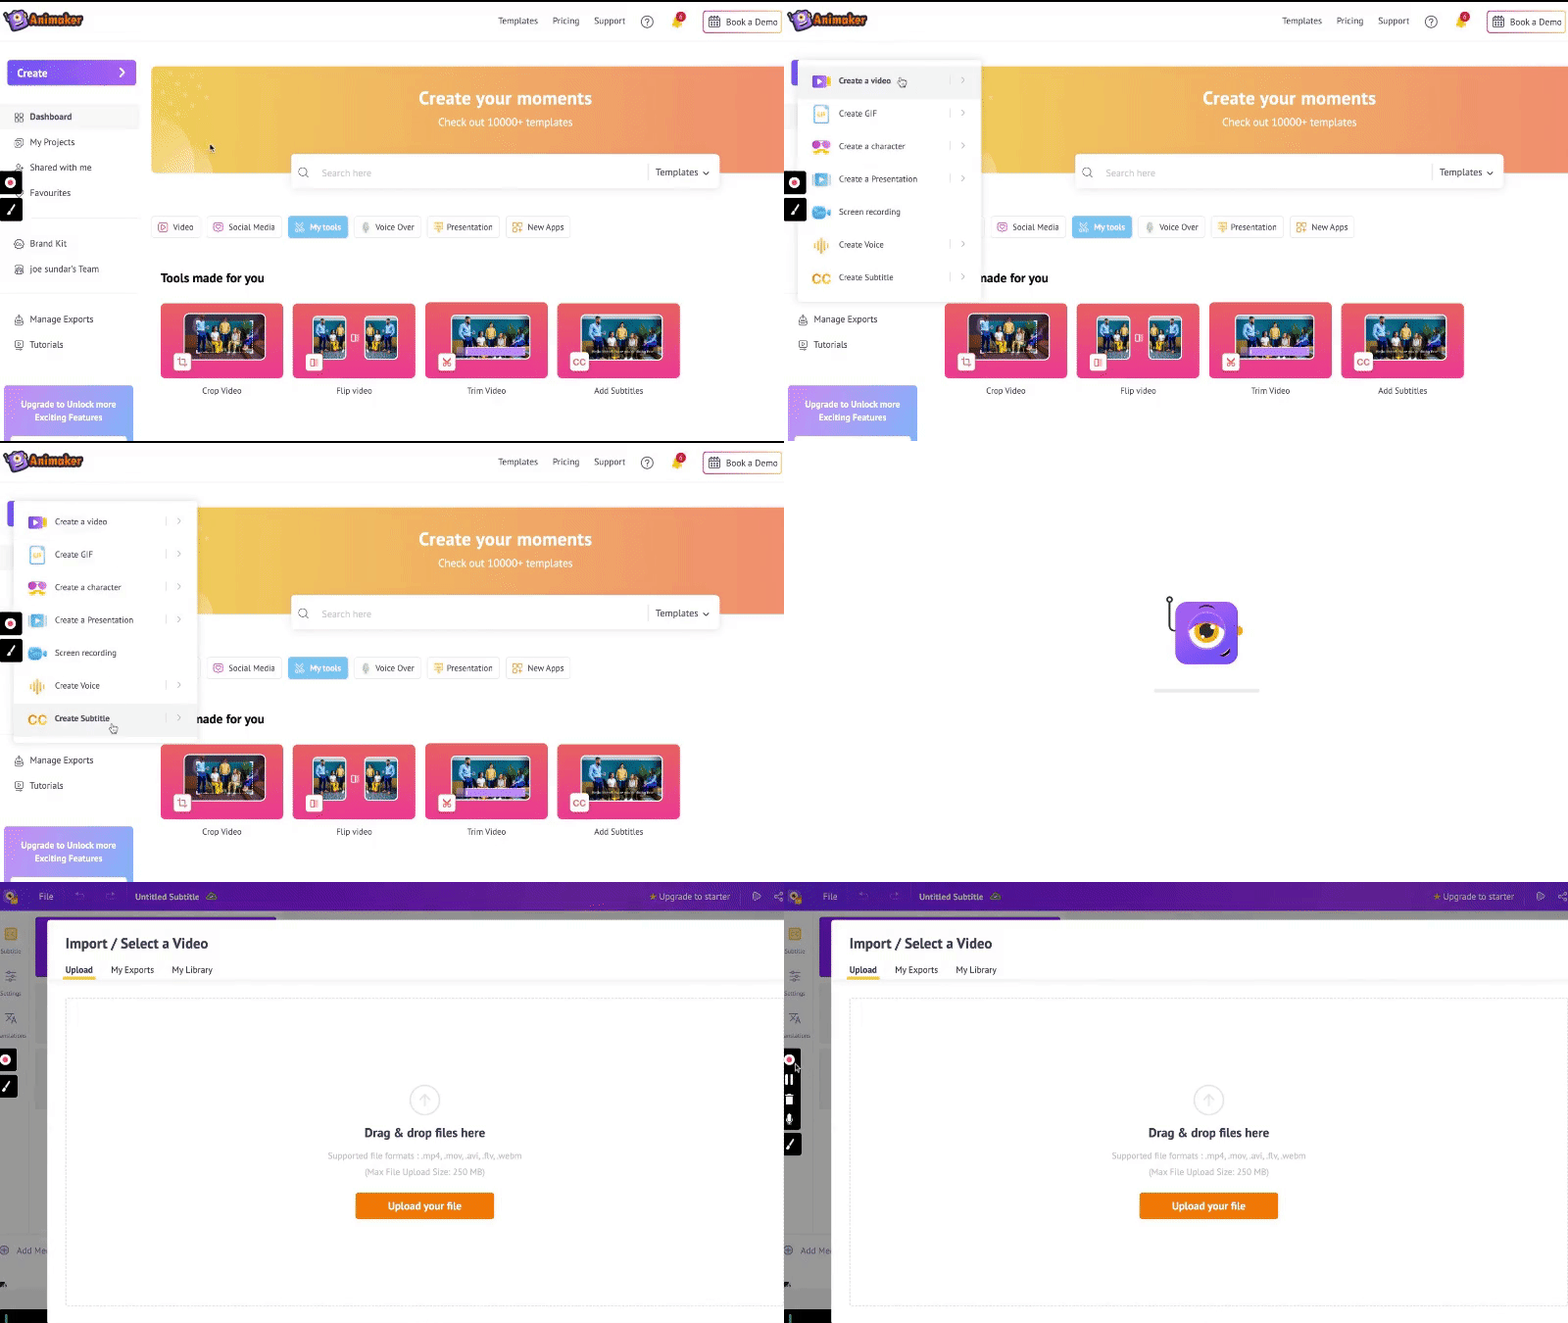
ii) After you have created your account and logged in, you will see the Animaker dashboard on your computer screen. In the top left corner, click on Create button and choose Create Subtitle from the drop-down.
iii) You will see a new screen open up with three different options to create subtitles for your videos - Auto Subtitle, Manual Subtitle and Upload a Subtitle File
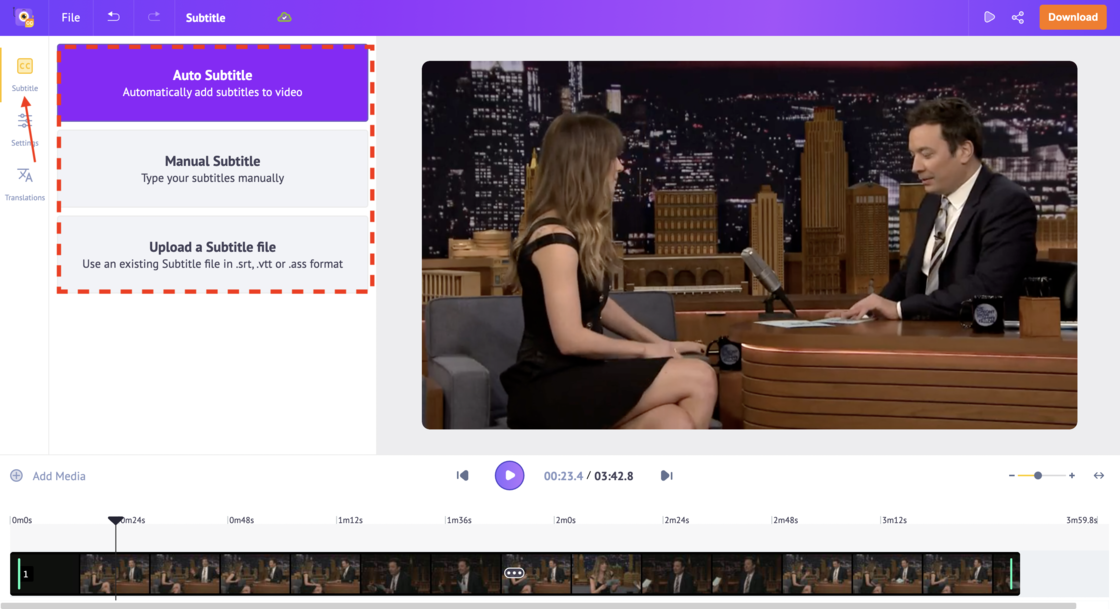
The auto subtitle option is the most fun. You can sit back and relax, and let AI do the work for you. The Animaker AI Caption tool has a database of 35+ languages. It will automatically identify the language of the video and translate it.
In this mode, you can still edit the subtitle that has been generated by AI. If a word has been misunderstood by AI, you can take control and edit it.
iv) You also have control over how the subtitles appear on the screen. This means you can change the size, color, font type and the alignment of the characters. You can also place the subtitles and style it’s background the way you like.
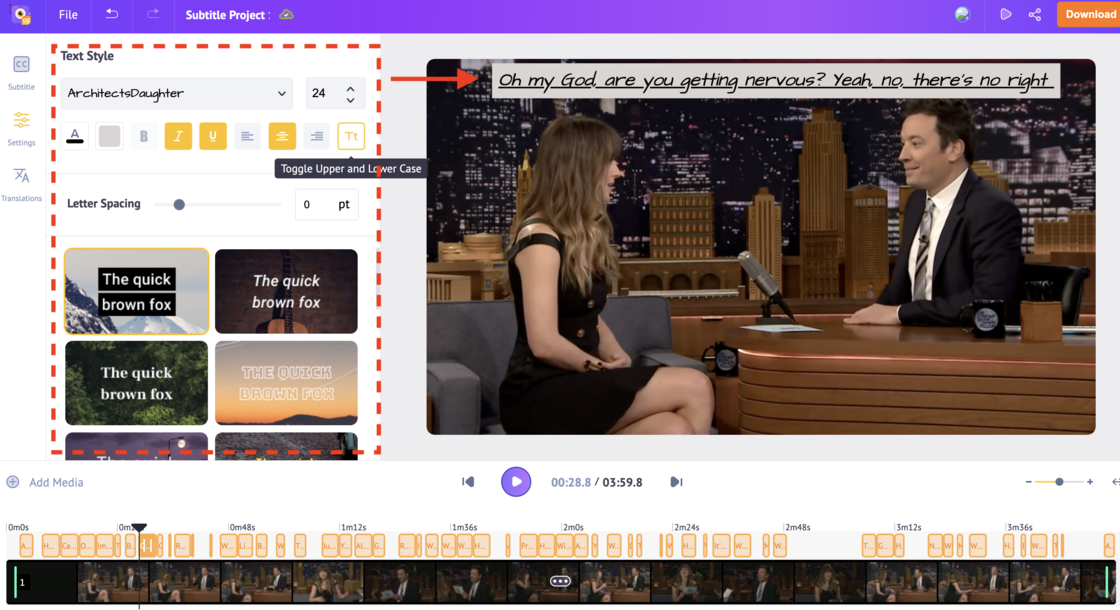
v) Here comes the last few steps: translating the subtitle to a different language. Like the rest of the process, this one also works like a charm.
After you have finalized the styling and placement of the subtitles, click on Translations on the left side panel of the screen. Click on Add new language, you will see a pop-up like below.
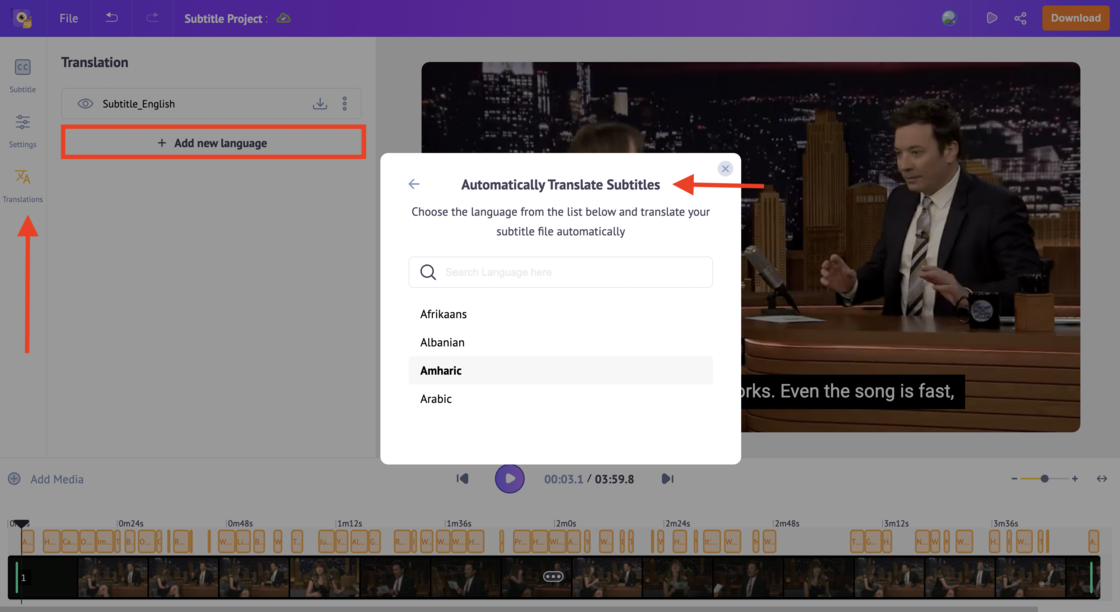
Here you will again see three options to translate the original language using AI, do it manually or upload an external subtitle file. We again recommend using the first option to make your life a lot easier.
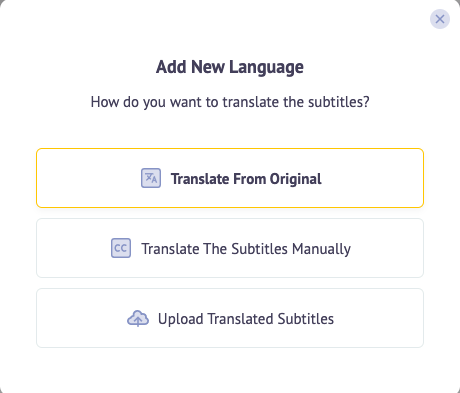
After you choose that option, you can type the name of the language that you want to translate the subtitle.
The AI will work its magic and get the newly translated subtitles in a matter of seconds.
vi) After the subtitle has been translated, it will appear on the screen like below:
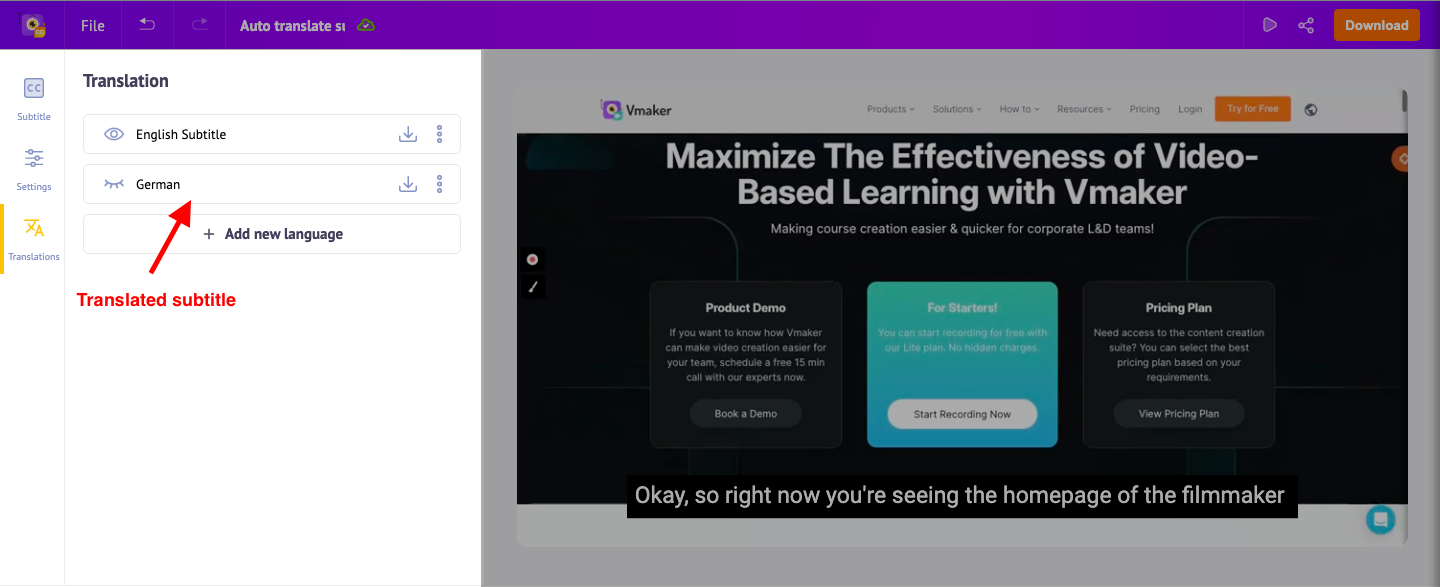
By default, the tool will display the subtitle in the original language of the video. To make the new translated language default language, click on the three vertical dots next to it. And, then select Set as default
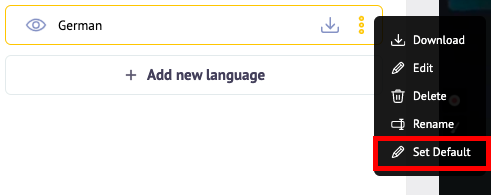
The video will display the subtitles in the newly selected language. You can download the video by clicking on the Download button in the top right corner of the screen.
vii) You can also download the subtitle files. They can be downloaded in .srt, .ass and .vtt format. If you plan to upload the video and subtitle file in a different tool, this will be useful.
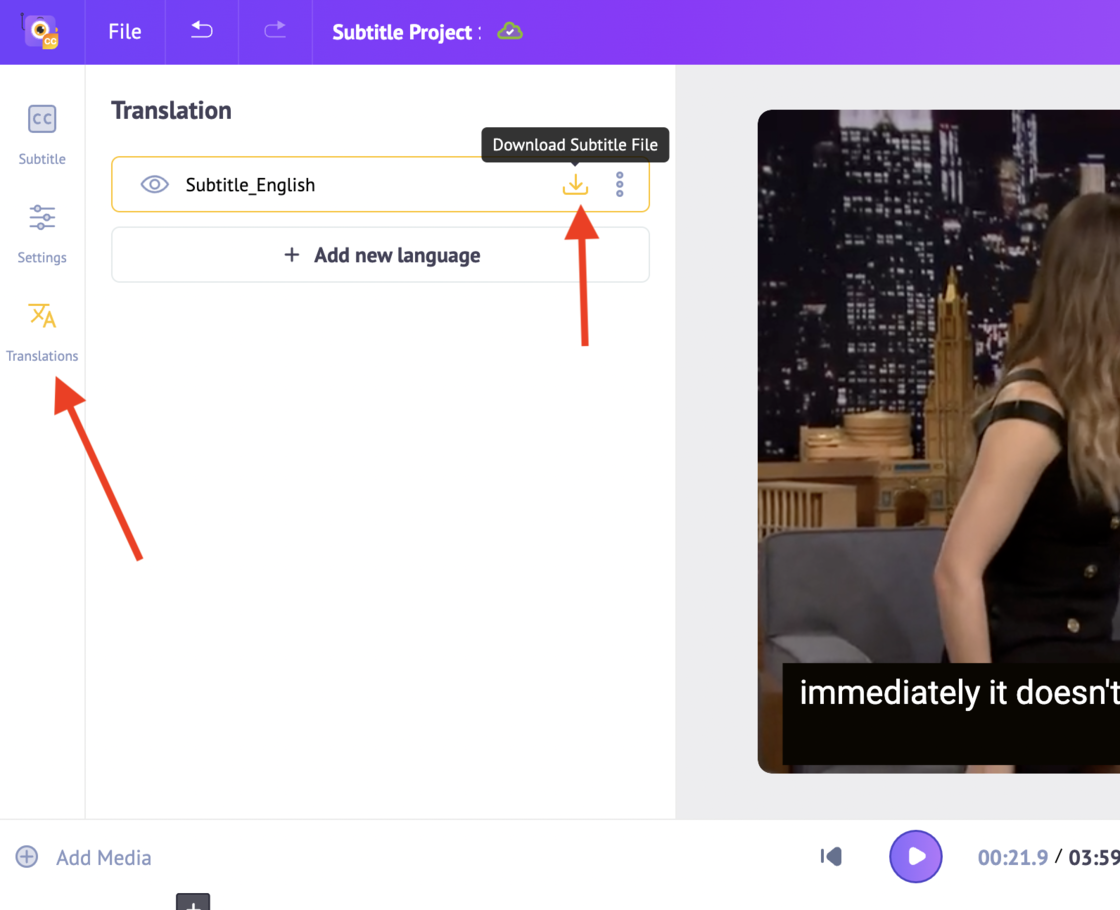
2) Adding multilingual subtitles to livestream videos
Livestream videos like webinars can also be translated into a different language using this AI-powered multilingual subtitle generator. The advantage of this is that you can share this recording with others who are not familiar with the language in which the video is recorded.
This is an intelligent technique of creating a bigger audience without spending too much time on hiring a translator and paying them to get this done.
To add translated subtitles to a livestream video, follow the steps mentioned below in the same sequence -
1) Record your livestream video using a screen recorder
2) Download the screen recording video
3) Sign up/ Log in to Animaker
4) Click on the Create button and choose Create Subtitle from the drop-down
5) Select Auto Subtitle to auto-generate captions for the livestream video recording
6) Decide the styling and placement of the subtitles
7) Click on Translation, followed by Add new language button. Choose the language you want the original subtitle to translate
8) From this pop-up, choose Translate from Original
9) You will see the new language subtitle file appear on your dashboard
10) You can set it as default if you want the video to display the subtitle in this new language
11) Once the video is ready, click on the Download button to download the video
3) Adding multilingual subtitles to online meetings
Online meetings can get hectic if there are many participants from different parts of the world. As people come from different language backgrounds, it becomes tough to decipher the message if someone’s speaking a different language.
This is where AI multilingual subtitle generator can come in handy. Download the meeting, sign up for Animaker, generate the subtitle in translated language, and you’re set.
If you cannot download a meeting because you’re not the host, you can use a screen recorder to record the meeting as a participant without letting the host know about it. If you need help, here’s a video that will guide you through -
Once you have downloaded the meeting recording, follow the steps below to get translated subtitles with the help of AI -
1) Sign up/ Log in to Animaker
2) Click on the Create button and choose Create Subtitle from the drop-down
3) Select Auto Subtitle to auto-generate captions for the livestream video recording
4) Decide the styling and placement of the subtitles
5) Click on Translation, followed by Add new language button. Choose the language you want the original subtitle to translate
6) From this pop-up, choose Translate from Original
7) You will see the new language subtitle file appear on your dashboard
8) You can set it as default if you want the video to display the subtitle in this new language
9) Once the video is ready, click on the Download button to download the video
You’re all set
Whether you want a multilingual subtitle for a screen recording, livestream video or any purpose - this AI multilingual caption generator tool is your go-to resource.
It’s extremely useful, capable and easy. It can save you tonnes of time and money. Follow the steps mentioned in this blog, and your video with multilingual subtitles will be ready in no time.
Recommended Readings:
Turn Your Presentations Into Exciting YouTube Videos With Subtitles
How to add subtitles or captions to Zoom meeting recordings
How To Create a Viral YouTube Video Using ChatGPT & Vmaker
