Vmaker Tutorials

Tutorials that help you get started, learn useful tips
and tricks to create engaging videos!

Vmaker App
Chrome Plugin

Installing the Vmaker Mac application

Step 1: Click on Download Vmaker Mac application on the Download Vmaker pop up.

Step 2: Once the .dmg file is downloaded, click on it to initiate the installation.

Step 3: On the installation window, drag and drop Vmaker into the application folder to complete the installation.

Step 4: To launch Vmaker, click on the finder and open the application folder. You will be able to see Vmaker here. Click on Vmaker to open the application.

Step 5: Your Mac may ask you permission to open Vmaker, click on allow to proceed and open Vmaker.

Recording modes on Vmaker Mac application - Screen + Webcam, Webcam only, Screen only

1. Screen + Webcam

Once your launch the Vmaker Mac application, you will see three recording options

Selecting Screen + Webcam will allow you to record your screen and Webcam with voice over.. Once you select this option, you will see a webcam bubble appear on your screen.

2. Screen recording only

Selecting screen recording only will allow you to record your entire screen with voiceover.

3. Webcam recording only

Selecting webcam recording only will allow you to record yourself using the webcam with voiceover.

Full Screen Screen Recording

On the Vmaker Mac application, you will see the option to select Full screen recording, Record a window and Custom size. Selecting full screen recording will allow Vmaker to record your entire screen. You can use Full screen recording for either Screen + Webcam recording or Screen recording only option.

Record a window

Selecting ‘’Record a window’’ will allow you to select a particular window to record. For example, it could be an application window or a different folder you have open on your computer.

Custom size

Selecting ‘’Custom size’’ will allow you to record a particular section of the screen by selecting it. Click on “‘Custom size’’ and click on start recording. You will be asked to select the section of the screen you wish to record. Once you have selected, click on ok to start recording.

Microphone setting

Under the microphone setting, you will see the option to select your microphone input. If you use an external microphone for your PC, it will show up on this drop down. You can select the microphone input from here. If you do not use an external microphone, the default microphone input will be selected.

Computer audio

Enabling computer audio will allow Vmaker to record the audio playback from your computer directly. To record audio in high quality, it is suggested to use headphones. For example, when recording online meetings or any video playback on Google Chrome, select the computer audio recording option with a headphone connected. If you use computer audio recording without a headphone connected, you might hear an echo in the recording. To avoid that, please record with a headphone connected.

Selecting the recording resolution on Vmaker Mac application

From the drop down, you can choose the recording resolution of your choice from 360p to 4k HD. On the free plan of Vmaker, you can record upto 720p. Based on the quality of your internet connection, Vmaker will suggest you the optimum recording resolution for best results.

Recording limit on the Vmaker free plan

The free plan of Vmaker has a duration limit. To record for longer duration, you can upgrade to Vmaker Premium Plans.

Control menu on the screen

Stop recording button

Click on this button to stop the recording. Once you stop recording, the video will be automatically uploaded to your dashboard.

Pause recording button

Click on this button to pause the recording. This is helpful in taking a break when recording a video.

Delete recording button

Click on this button to delete the video before it is stored on the dashboard.

Mute microphone button

Click on this button to mute/unmute the microphone when recording.

Drawing tool

Using the drawing tool, you can draw on the screen (annotate) while recording your screen. Click on the drawing tool, select the colour of your choice and draw on the screen to create engaging videos.

Selecting workspace on the Vmaker Mac application

If you have created more than one workspace on your Vmaker dashboard, you can select the workspace using which you wish to record the screen using Vmaker. Please note that you might have upgraded only one of your workspaces. Hence, you will be able to use the premium features only when the paid workspace is selected.

Using Frames for webcam bubble

You can customize your webcam bubble by adding a frame to it. You can select a frame that's quirky or purposeful from the collection of default frames.


Step 1: Select screen and webcam recording option on Vmaker

Step 2: Once the webcam bubble appears, click on the confetti icon

Step 3: Select the frames of your choice

Step 4: Click on done


You can now proceed to record using Vmaker.

Using Virtual background for webcam bubble

You can customize your webcam bubble with a virtual background. You can select a virtual background from the available options or upload an image of your choice from your PC and add it as a virtual background for your webcam bubble. You can also choose to remove the background of your webcam overlay completely.


Step 1: Select screen and webcam recording option on Vmaker

Step 2: Once the webcam bubble appears, click on the virtual background icon

Step 3: Select the virtual background of your choice

Step 4: Click on done


You can proceed to recording using Vmaker.

Using frames and virtual background for a striking looking webcam bubble

You can customize your webcam bubble to look striking by using both frames and virtual background together.


Step 1: Select screen and webcam recording option on Vmaker

Step 2: Once the webcam bubble appears, click on the confetti (frames) icon

Step 3: Select a frame (preferably shapes such as square, rectangle or circle)

Step 4: click on done

Step 5: Click on the virtual background icon

Step 6: Select a virtual background of your choice (no background works best with square, rectangular and circular frames)

Step 7: Click on done


You can proceed to recording using Vmaker.

Preferences section on Vmaker Mac application

1. Language selection

You can choose to use Vmaker from your preferred choice of 7 international languages such as English, German, French, Italian, Russian, Portuguese, Spanish. Just click on the drop down and select the language in which you use to Vmaker

2. Recording resolution selection

You can click on the drop down menu to select the default recording resolution of the video. You can select from 360p to all the way upto 4k HD videos. Please note that 720p recording resolution and above requires good internet connectivity.

3. Recording countdown (enable/disable)

Recording countdown is the 3 - 2 - 1 that appears after you click on the start recording button. You can choose to enable or disable it as per your wish.

4. Highlight mouse clicks (enable/disable)

Highlight mouse clicks will create a circular highlight whenever you perform a mouse click action on the screen when recording using Vmaker. You can choose to enable or disable it.

5. Flip camera (enable/disable)

Flip camera flips/mirrors the webcam bubble when recording screen and webcam or just the webcam.

6. Control menu (enable/disable)

Control menu appears on the left side of your screen by default. It allows you to stop/pause the recording, mute the microphone, delete the video and allows you to use the drawing tool. You can hide the control menu under preferences should you want to.

7. Record sound (enable/disable)

The record sound is a bong tone that acts as que just before your recording stars after the countdown. You can chose to enable or disable it under preferences.

8. Record audio in mono (enable/disable)

If you prefer to record your audio in mono, you can turn on mono recording. Disabling mono recording will automatically allow Vmaker to capture the audio in stereo format.

9. Show dock icon (enable/disable)

You can make Vmaker appear on the dock of your Mac by enabling ‘’show dock icon’’.

10. Launch at startup (enable/disable)

Enabling ‘’Launch at startup’’ will allow Vmaker to launch as soon as your Mac starts up.

11. Enable auto update (enable/disable)

Enabling ‘’auto update’’ will allow Vmaker to update itself as soon as a new update is available. The new updates will include bug fixes and new feature releases. It is advised to keep ‘’auto update’’ enabled.

12. Customize shortcut keys

You can customize the shortcut keys for key actions such as cancel recording, pause & resume recording, start & stop recording, toggle drawing tool and toggle webcam. Just replace the the final alphabet keys with the keys of your choice.
Video Player Page

Giving your Vmaker Video a Name

Make sure you are logged in to your Vmaker account

Once you enter the player, hover our your current video name right beneath the player window

You will see a pencil icon appearing at the end of the video title

Click on the pencil icon and you will find your current video title selected

Click delete and type in your new video title

Once you are done, press enter and click at an empty space of the screen

You will get a message “Project renamed successfully” at the right bottom of your screen

How to share your Vmaker video

Copy Link - from share menu

You can find the share button on the top right corner of your page or right below the player window

Once you click on the share button you will find the share menu pop up coming up

The video URL is loaded automatically on the pop up and you will find the copy button next to it

Click on the button to copy the URL

Your video URL is now copied to your clipboard

You can paste it on the respective channel such as email or messenger to share the video with others

Copy Link - direct

Once you are on the player page, you can copy the video URL directly from the address bar of your browser

You can share this url to others and when they click on the url, they will be able to watch the video

Social Share - Facebook, LinkedIn, Twitter, Gmail

Click on the share button from the player page located either at the top right of the page or right below the player window

You will find the social share options from the share pop up window

Click on any of the social share option such as Facebook, Twitter or LinkedIn

You will be redirected to the social website you chose and shown a preview of the video with the thumbnail

You can edit the caption for the post and click on post to share on the respective social site

Share - Gmail

Click on the share button from the player page located either at the top right of the page or right below the player window

From the share pop up window, click on the right arrow below the copy button

You will find the Gmail icon - click on it

You will be redirected to the gmail compose window (make sure you have logged in to your gmail account)

You will find a default message added with the video url

Edit the message if required and type in the email id to whom you want to share the video

Click on send

Share - YouTube

Click on the share button from the player page located either at the top right of the page or right below the player window

From the share pop up window, click on the youtube icon

Click on the ‘+’ icon at the bottom of the pop up to add your youtube channel

Once you click on it, a pop will appear and ask you to sign in to your youtube channel

Enter the login details and select Allow when asked for managing permissions (this will allow Vmaker to post the video on your youtube channel on your behalf; no content will be posted without your permission)

Now the channel is integrated. You will find the channel name appearing on the share pop up

Click on the channel name and you will be asked to enter the video title, description and tags for the video

Once you have entered the above click on ‘publish’ and your video will be posted on your channel

The integration routine is only applicable when you share for the first time. Once the channel is integrated you can post directly to your channel next time

You can also click on the ‘+’ icon and add another chanel to the list

How to embed Vmaker videos to your website

Click on the share button from the player page located either at the top right of the page or right below the player window

From the share pop up window, click on the embed icon

You will find the embed code appearing on the pop up

Click on ‘copy’ and the code will be copied to your clipboard

You can now paste this html code to your website and the video will be embed to your website.

You can adjust the frame width and height in pixels to adjust the video player size on your website

How to set auto expiry for your videos

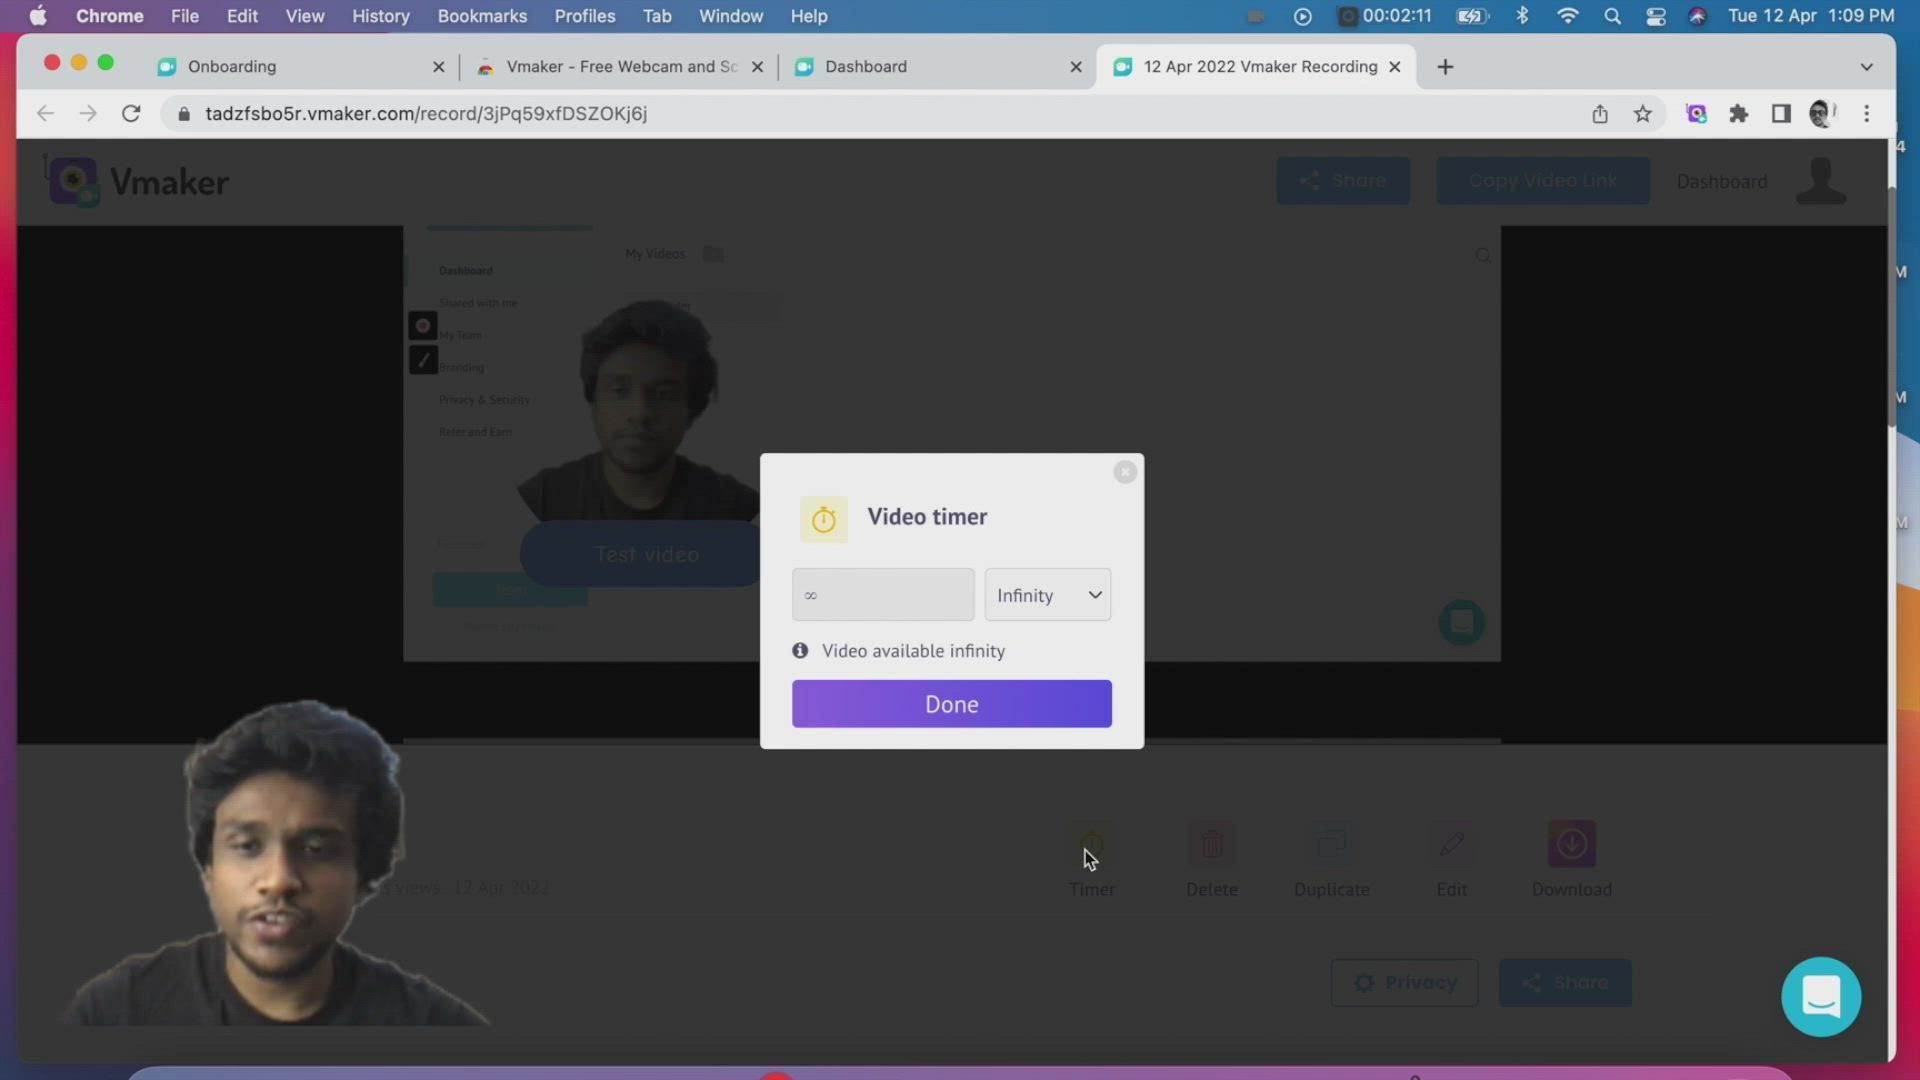
From the player page, click on the timer icon next to the video title

The video timer pop up will appear

Click on the drop down list and select from Hours, minutes, days, views, and infinity

You can set the limit based on the drop down list (eg. 2 hours, 10 minutes, 25 views, 3 days etc.)

Once the set limit is met, the link becomes inactive and the users with the link will be unable to access the video except for the owner of the video

Once you set it to infinity there will be no limit on video access

How to delete your vmaker video

From the player page, click on the delete icon next to the timer icon

Once you click on the same, you will be asked to confirm the operation through a pop up

Click on ‘delete’ from the pop up to confirm the operation

Your video will be deleted

How to duplicate your Vmaker video

From the player page, click on the duplicate icon next to the delete icon.

You will be asked to confirm the operation via a pop up

Click on Duplicate from the pop up to confirm the operation

Your video will be duplicated and you will get a confirmation message on the right bottom of the screen.

You can click on the link from the message or go back to your dashboard

You will find the duplicated video on the dashboard as the first file name copy of "video title"

How to edit your vmaker video

The new edited video will replace the original video, if you want a copy we recommend you to duplicate the video and then start the editing process

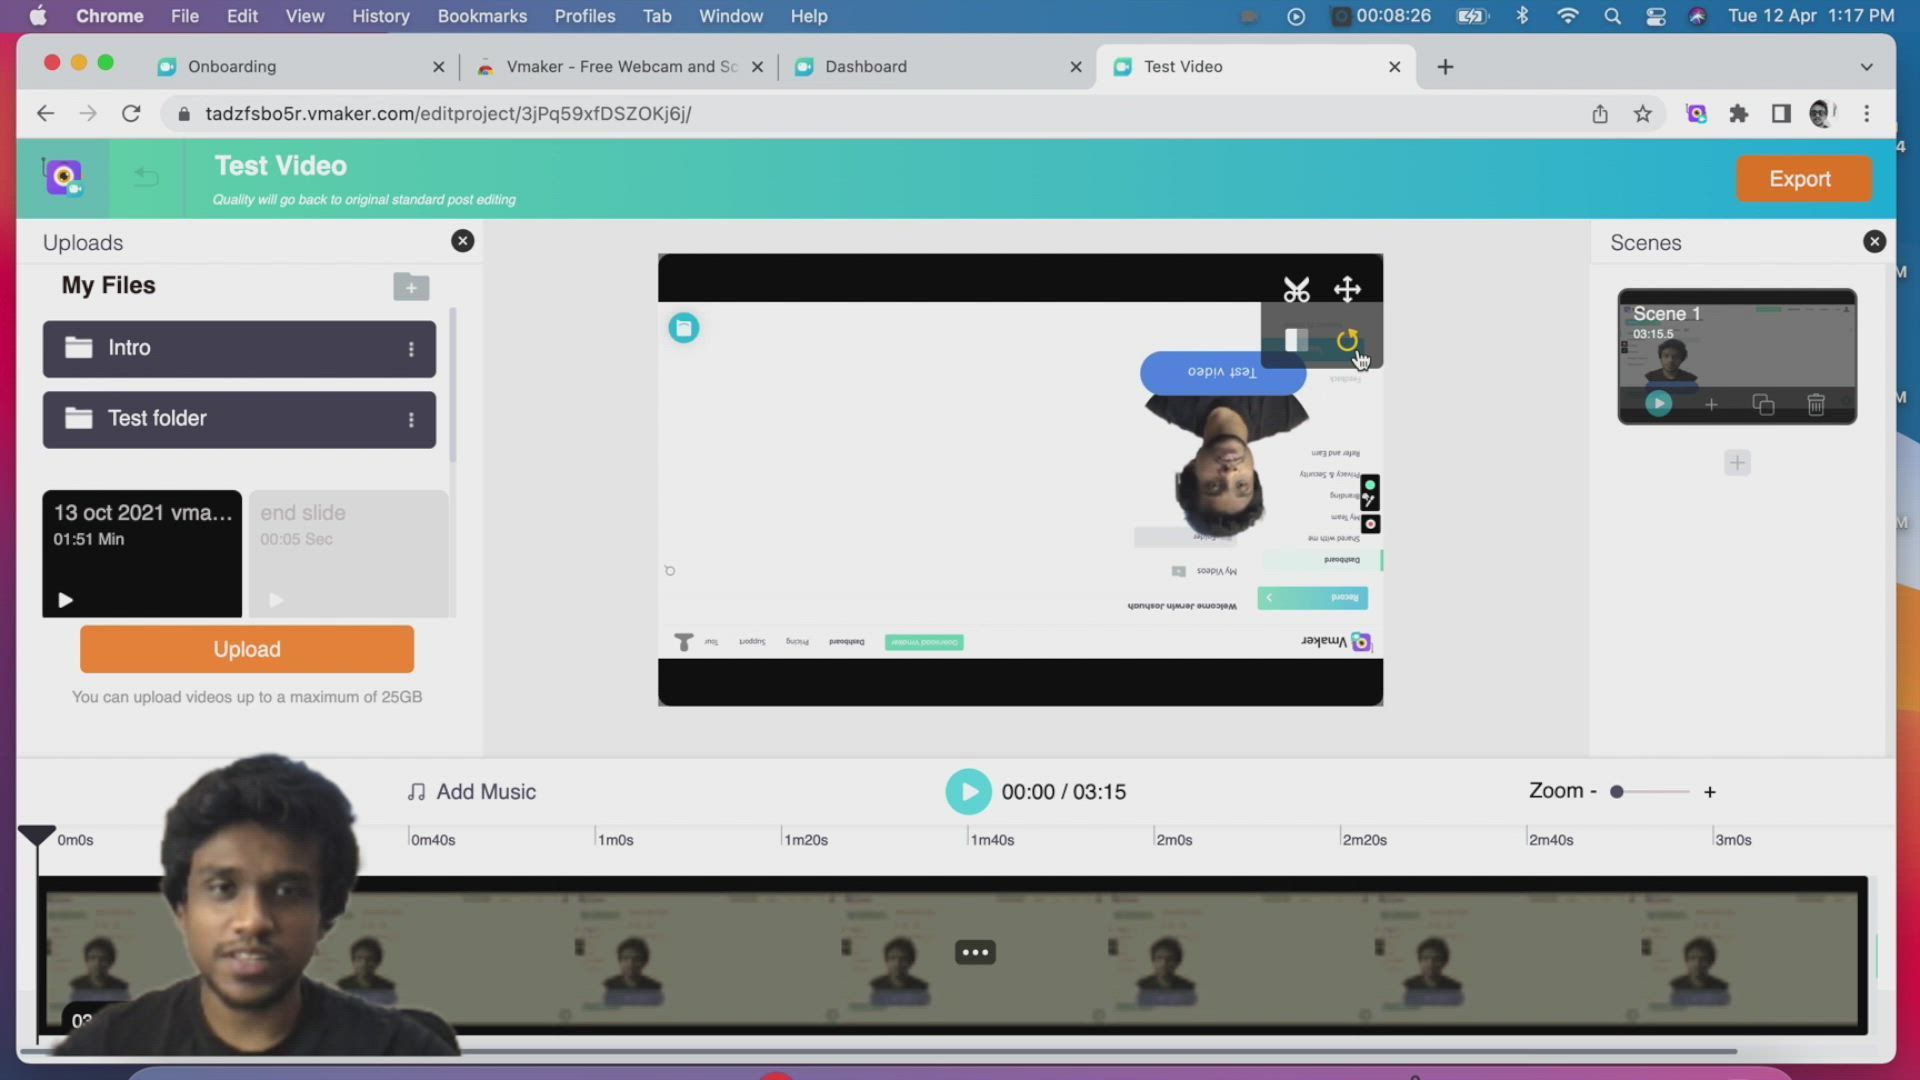
From the player page, click on the edit icon and the editing window will appear with the current video

On the editing window, you will find the preview of the video in the middle of the page. On the top right corner of the preview window, you will find 4 icons

Trim Video

Click on the scissor icon and the trim window pop up will appear.

Move the editing scale from left and right to trim the video.

The portion of the video between both scales will be retained.

You can click on the play icon from the bottom left of the trim pop up to play the view preview

You can click on the volume icon on the bottom right to adjust the volume of the video or mute the audio

Once you are done with the trim, click on the green tick icon on the bottom right corner. Your video will be trimmed.

To cancel the trim, click on the cross icon from the top right of the pop up window

Resize

Click on the resize icon from the top right corner of the preview window

You will find the transform window on the player preview

Click on any one of the corner and drag the frame to resize the video

Once you are done click on the apply button below the preview window

Click on the cross icon next to the apply button to cancel the resize option

Flip

Click on the flip icon from the top right corner of the preview window.

You will find the video flipped in the preview window

You can click on the same icon to flip the player window left, right, top and bottom

The changes are saved automatically and no confirmation action needed

Rotate

Click on the rotate icon from the top right corner of the preview window.

You will find the video roasted 90 degree in the preview window

You can click on the same icon to rotate the player window 180, 270 and 0 degrees further

The changes are saved automatically and no confirmation action needed

Uploads

On the left hand side of the preview window, you will find the Uploads section

Click on the Upload video button at the bottom of the section to upload a new video to the edit window

You can upload videos up to a maximum of 25GB

You can click on the +Folder icon to create an empty folder. Enter the name of the folder and press enter

Drag and drop the video to the folder to organize the uploads

Click on the three dots on the folder to rename, delete or move the folder

Scenes

On the right hand side of preview window, you will find the scenes section

Your current video will be added as scene 1

You can click on the + icon from the scene window to add another empty scene, click duplicate icon to create a copy of the same scene, click on delete to delete the scene

You can also click on the play icon to play and preview the current scene

Click on the + icon below the current scene to create a new empty scene

Each empty new scene created will be 10 seconds by default

You can add a new video to the empty scene by double clicking on a video from the My Files section on the right hand side of the player window

Add Video

Click on the add video button above the video timeline bar to upload a new video to the editor dashboard

Click on the three dots from the timeline preview to adjust the volume of the clip, add a new scene or delete the scene

Once you are done with the edits, click on Export at the top right corner of the screen to create the new edited video

How to download your Vmaker video

From the player page, click on the download button below the player window

If the video is just uploaded, you will get a message stating video is still being processed

In such case, click on the download button after some time

Once the video is processed, when you click on the download button, the video will be downloaded automatically in mp4 format.

Manage Video privacy settings

Under the player window, click on the privacy button next to the share button

You will find three options under privacy settings

Engine Indexing - Turning this option on will allow google to index your video, turning this off will prevent google from indexing your video and showing it on search results

Hide Download Button - Turning this ON will hide the download button to anyone who watches the video except for the video owner. This will disallow other viewers to download your video

Make Video Private - Enabling this will make the video private and restrict access (viewing) to the video to everyone apart from the owner of the video.

Vmaker Dashboard

Deleting multiple videos

You can choose to delete multiple videos at once. Just at the top left side of the video thumbnail and select the video. You can select multiple videos at once as well.

Once you have selected the videos to be deleted, navigate to the right side of your dashboard where you will see the delete icon. Click on it to delete the selected videos.

Creating folders on the dashboard

Click on the folder icon on the top of your dashboard to create a new folder. You can assign a name of your choice or rename the folder at any point of time. Once the folder is successfully created, you can move videos into the folder.

Moving videos inside a folder

To move a video inside a folder, hover over the 3 dots on the thumbnail of the video, click on it and select on move to folder.

To move multiple videos inside a folder, hover on the left side of the video thumbnail, select multiple videos and click on the move to folder icon on the right side of the dashboard. (near delete all icon)

Sharing folders

To share a folder, click on the 3 dots on the folder, click on share and enter the email address of the recipient. You can also copy the link and share it directly. You can assign view or edit access to the recipient. Assigning edit access will allow the recipient to edit your video on Vmaker.

Shared with me section

Any Vmaker video or folder shared with you will appear under the shared with me section on the dashboard.

My team - inviting team members

Under the My Team section, you can invite team members to your workspace. To invite team members, enter their email address, select the role you want to assign them from the drop down (member/admin), and click on invite

Member: A member will get added to your workspace to collaborate

Admin: Admin can invite new team members, moderate privacy and branding settings for all members.

Branding

Renaming workspace: You can rename the workspace under the branding section.

Show Vmaker branding: Disabling Vmaker branding will remove the Vmaker logo from the player page.

Brand logo: You can upload your own logo to customize the branding on the player page. Upload a logo preferably in the square size.

Brand Favicon: You can add a custom brand favicon by uploading an image or or use your logo as the brand favicon.

Customizing brand color: Pick a custom color from the spectrum or add the color code to add brand color to the call to action buttons on the player page.

Custom URL: You can customize the url of your videos by adding your own name/brand name to it. Click on edit branded url, add the subdomain text and click on apply.

Custom CTA: On the enterprise plan of Vmaker, you can add a custom call-to-action on the player page. Just enter the text for the CTA and add a URL to which the viewer is to be redirected to.

Privacy and security

Disable download for all videos: You can disable download for all your videos from here. This means whenever you share a video, the recipient will be unable to download them.

Make my videos private: Enabling this will make all your videos private. Your videos will not be viewable to anyone even if they have the video URL.

Refer and earn

Refer and earn rewards - If you’re a free user of Vmaker, you can refer new user to Vmaker and earn yourself Vmaker rewards. These reward points can be used to redeem Vmaker paid plans.

Affiliate program - If you’re a paid user of Vmaker, you can sign up for Vmaker affiliate program. Once you sign up and start referring new users, you can earn upto 35% commission on each new license purchased through your affiliate link.

Creating and Managing New Workspaces

Creating a new workspace

Click on your profile picture at the top right corner of your Vmaker dashboard

Scroll down to the bottom and click on create new workspace next to + icon

You will be asked to confirm your action via a pop up. Click on yes

Your new workspace is created

Renaming your workspace

Click on Branding from the menu on the left hand side

You will be taken to the branding section where you can see the option to edit your workspace name

Select the current workspace name, click delete and type in your new workspace name

Once you have entered the same, scroll down to the bottom and click on save

Deleting your workspace

Click on your profile picture on the top right corner of your dashboard and choose account settings

Navigate to the Settings option next to the Edit profile section

Under workspace management you will find the option to delete your workspace

Click on delete and you will asked to confirm your action via a pop up

Click delete again on the pop up to confirm the action

Your workspace is deleted

How to start editing a video from the dashboard

Edit your videos easily without switching windows or tools using Vmaker’s in-built video editor.

You can access your video editor in two different ways:

Account dashboard

Go to your account dashboard and hover your mouse over the video you want to edit. You will see three dots on the right top corner of the video.

Now move your cursor over those dots, and you will find Edit. Click on Edit, and you will be taken to the video editor.

Video player page

Alternatively, you can also access your video editor from your video player page.

If you are on your account dashboard, simply click on the video you want to edit. A player page will open.

Or, if you are on a video player page already, just after recording a video, simply follow the next steps.

On the video player page, you will see an Edit button just below the video. Click the button and you will be taken to the video editor.

How to use the trim feature to trim the start and end of the video

Remove unwanted intro and outro scenes effortlessly!

Step 1: Once you are inside Vmaker’s video editing tool, click on the ✂️ icon on the top right corner of your video. It’s the Trim feature.

Step 2: Now, a pop-up will appear with a video timeline, and in that, there will be markers at both ends. Drag those markers wherever necessary to select the area you want to save.

Step 3: Once you are happy with your selection, click the green checkmark button.

Using the flip, rotate, and resize feature

Flip

Step 1: In the video editor, you will see a toolbox in the top right corner of your video. Click the rectangular icon inside that box.

Step 2: You can flip your video in vertical and horizontal directions, so keep clicking the icon until you find your desired orientation.

Step 3: Leave it as such once you are okay with your changes. Your changes will be saved automatically.

Rotate

Step 1: From the toolbox, tap on the rotate icon. You can rotate your video in 90° increments.

Step 2: Leave it as such once you are happy with the orientation. Your changes will be automatically saved.

Resize

Step 1: From the toolbox on the top right corner of your video, click on the plus icon. You will now see markers on all the corners of the video.

Step 2: Adjust the markers to select the desired area that you want to crop and retain.

Step 3: Once you are fine with your selection, click the Apply button below.

How to upload a video to the Vmaker editor

Step 1: After you have opened your video editor, you will find an Upload button on the left side of your page. Click on the Upload button and you will be taken to a system panel where you can select the file you want to upload.

Step 2: After selecting the file click Open. Now your file is uploaded!

Organizing videos in folders within the editor

You can arrange your uploaded files within folders to keep things tidy!

Step 1: In your video editor, under the upload section click on the folder icon with “+” symbol in it. You can find this icon on the top right corner of the upload section.

Step 2: A small pop-up will appear asking you to name the folder. Enter your desired name and press Create.

Step 3: Now your folder is created. If you wish to move your already uploaded videos to this folder you can simply drag the videos to this folder.

Step 4: Or you can hover over the three dotted button on the video and select Move. A menu box will appear in which you can select the folder and move the video.

Tip: To make things easier first create a Folder and then upload your videos to it. This way you will avoid the extra work of moving your videos.

How to use the scenes feature to merge two videos

Scenes feature allows you to stitch different videos together and transform them into a single video.

Here’s how to use scenes feature:

Step 1: Upload a video you want to merge with your recorded video by clicking the on the Upload button.

Step 2: Once your video is uploaded, go to the scenes tab on the right side of the screen and click on the “+” icon. This will create an empty scene for you to add your video.

Step 3: Now go to the Upload toolbar and click once on the video that you want to add. Your video will be added to the timeline.

Step 4: Alternatively, you can also add a scene or video to your timeline by clicking the “+” icon in the video timeline toolbar at the bottom of your screen.

Step 5: That’s all! Your scenes will be merged while you export your video.

How to use the trim and scenes feature to trim out unwanted sections of the video

Previously we saw how to use the trim feature to remove the unwanted parts at the start and end of the video.

In this section we will see how you can remove the unwanted sections in the middle of the video by using the trim and merge feature.

Step 1: Firstly, duplicate the video that you want to edit. To duplicate the video, click on the Duplicate Scene option on your video under the scenes tab.

Step 2: Now you will see two scenes under the scenes tab. Click on the first scene and go to the Trim option on the top right corner of your video.

Step 3: A pop-up will appear with a video timeline. In that pop-up there will be markers at both ends. Drag those markers wherever necessary to select the area you want to save.

Step 4: Once you are happy with your selection, click the green checkmark button. This will be saved as Scene 1.

Step 5: Repeat the same process with the duplicated video too, until you have removed all the unnecessary parts of your video. Now you should be having multiple scenes under the scenes tab.

Step 6: You can render all your scenes while exporting your video.

Exporting a video after editing

Once you are all set with your edits, click on the Export button the top right corner of your screen.

You will be asked to select the export quality of your video. Select your desired option and click on the Export button.

Give it a few seconds, and your video will be ready!